Getting started with Google Groups
This page will help you get started with Google Groups at Reed.
You can use Google Groups to send emails to your list, but it also has the ability for you to share documents or calendar events with your group!
If your question isn't answered here, you can explore Google's help pages. For help with using and managing groups, see below.
Request a new Google Group here.
General Group Administration- Managing Your Google Group
- Adding Members to Your Google Group
- Changing Roles of Members
- Adding non-Reed Emails to Google Group
- Changing Moderation Settings
- Changing Joining Permissions
- Approving or Rejecting Posts
- Editing a Subject Prefix
- Adding Group to Public Directory
General
You can find the list of publicly-indexed, existing groups at
groups.google.com/a/reed.edu/forum/#!forumsearch/
You can view all the groups you belong to at groups.reed.edu.
Using a group
Note: Only members with Reed email addresses will be able to view the group web page (Members with non-Reed email addresses are only able to receive/send messages to the group from their subscribed email address).
Notifications
You can edit the frequency with which you receive updates from the group. To do so, go to groups.reed.edu and find the group you want to edit in the list of your groups in the main window. Click the dropdown menu under the subscription column. Then select how frequently you'd like to receive updates from this group.
Group Administration
Managing Your Group
In order to manage your group, go to groups.reed.edu, find the group you wish to manage, and then click the group name.
Adding Members to Your Group
On the left side of the screen, there will be a navigation bar, to manage the members of your group click Members. To add members click Add Members at the top of the screen. This will open a pop-up window where you can list all the members you'd like to add under the Group Members field. Then, you can add a welcome message in the box below or leave it empty to not send a message. Lastly, click the blue Add Members at the bottom to add the listed people.
If you'd like to invite members instead of adding members directly, then you can tick Directly add members off. This gives them the option of accepting your invitation to join the group, while directly adding members will automatically add them to the groups. Pending members allows you to view and either approve or deny requests to join the group. This page also lets you see outstanding invitations along with the dates sent and the invitation status. If someone requests to join your group, managers will receive an email notification about the request.
Note: Direct adding of members is disabled if Google profiles are required for membership. To turn off the Google profile requirement, go to Group Settings -> Member privacy on the left navigation bar. In the main window, select "Display name profile only" or "Either display name or organization profile" and click the save button on the bottom.
Changing Roles of Members
If you would like a member of your group to have moderator abilities, you can do so by changing their role. Under Members find the person you'd like to give moderator abilities. Then click the dropdown under the Role column and click Manager.
Adding non-Reed Addresses as Members
In order to add non-Reed addresses as members, the Google Group needs to have the correct permission: Group Settings → General → Allow External Members → On.
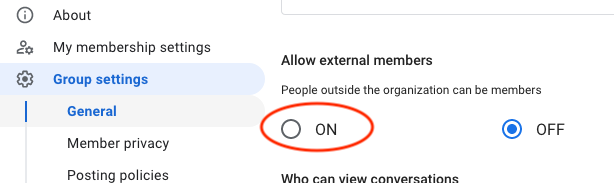
If you are trying to add a non-Reed address and encounter an error, contact us at cus@reed.edu or 503-777-7525 and we can change the permission for you.
Moderation Settings
You can edit permissions for who may post to the group under Group Settings -> General on the left navigation bar. Then under Who can post, choose from Group managers, Group members, or Entire organization (not recommended for most cases).
If you would like to change whether posts are moderated, you can change it under Group Settings -> Posting policies. Under Message moderation, from the dropdown menu choose either No moderation, Moderate messages from non-members, or Moderate all messages.
Joining Permissions
You can edit permissions for who may join or submit a request to join the group under Group Settings -> General on the left navigation bar. Under Who can join the group in the main window, select one of the following options from the dropdown menu:
- Invited users only - Only people who receive an invitation from owners or managers can join the group
- Organization users only - Anyone with a @reed.edu email address can join the group
- Organization users can ask - Anyone with a @reed.edu email address can send a request to join the group
Approving or Rejecting Posts
You can approve posts or deny them before they appear to the group. If a post is not approved within 14 days, it will be deleted. Message moderation must be on before posts can be approved or blocked.
- Sign in to Google Groups.
- Click My groups.
- Click the name of a group.
- On the left, under Conversations, click Pending.
- To read a post, click it.
- To approve or reject a single message click Approve message
or Reject message
to the right of the message.
- To perform an action on one or more messages:
- Check the boxes to the left of the messages (you may have to hover over the member's gmail icon).
- At the top of the screen, select an option:
- To approve the messages, click Approve message
- To reject the messages, click Reject message
- To approve the messages and automatically approve all future posts by those authors, click Approve author
.
- To ban the authors from the forum and report the messages as spam, click Reject author
.
- To approve the messages, click Approve message
Note:
- Posts that aren't approved are automatically deleted after 14 days.
- Posts marked as spam are automatically deleted after 7 days.
Adding a Subject Prefix
If you would like a message to have a prefix in the subject line, you can edit the setting under Group Settings --> Email Options.