Zoom Meetings
Reed provides a Zoom account and license to all Staff, Faculty, and Students.
Zoom allows you to host online videoconference meetings with multiple people, record meetings, present information by sharing your screen, and use group and private text chat.
Getting started:
Common Zoom tasks:- Change the speaker or webcam
- Use breakout rooms
- Record your Zoom meeting
- Share your screen or a Zoom whiteboard
- Assign scheduling privileges to another
- Schedule meeting for another
- Designate a co-host or alternative host
- Enable a chime when someone enteres the waiting room
- Turn on live captioning for your account and meeting
- Add pronouns to your profile
Sign in to Zoom
Visit https://reed-edu.zoom.us/signin using your Kerberos credentials. If this is your first time signing in then a Zoom account will automatically be created and a Meeting license will be applied to your account.
When signing in via the Zoom Workplace app on your device, click the SSO button and enter reed-edu as the domain.

Host an instant meeting
Open the Zoom application, sign in, and click New Meeting. Once the meeting begins, click Invite at the bottom of the Zoom window. You can send an email invitation or copy the meeting link and share that with your participants.
Note: All participants will need to download and install the Zoom software. If they have not already done this, the installation process will start automatically when they click a Zoom meeting link.
To end a meeting, click End Meeting (in red) at the lower right-hand corner of the window.
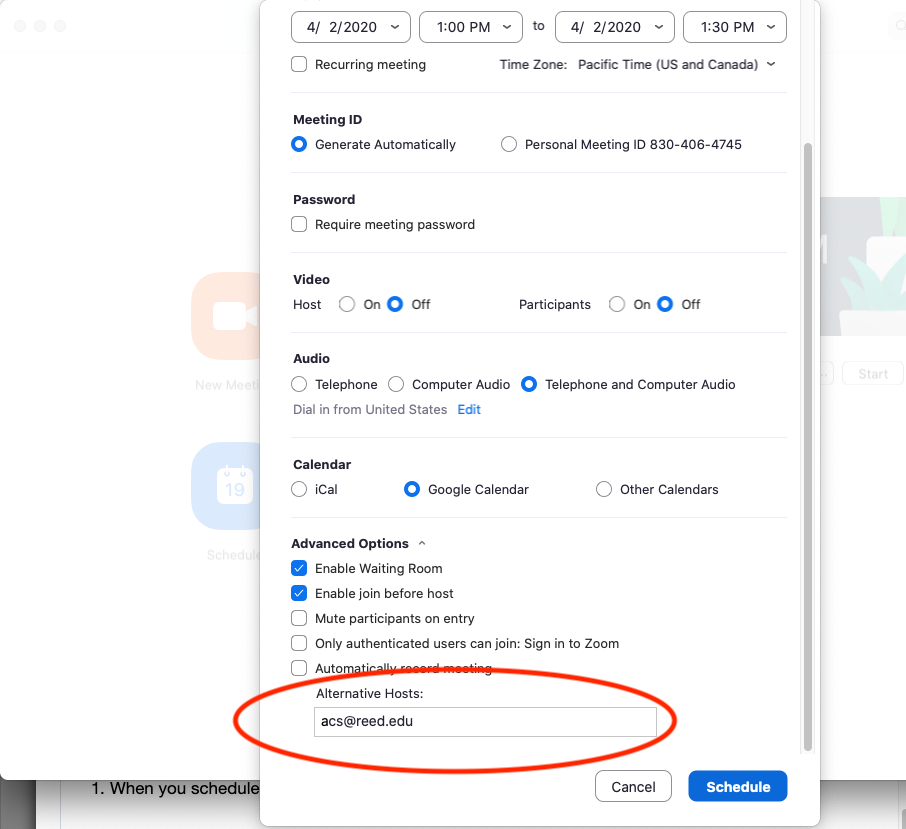
Schedule a meeting
Open the Zoom application, sign in, and click Schedule. Fill in the appropriate details. Recurring meetings will have the same link and meeting ID for each instance of the meeting.
Note: Selecting a Calendar in the meeting options will open the selected calendar application and create an event that includes the Zoom information. You can then invite your participants to that event.
To start a scheduled meeting, click Meetings at the top of the Zoom application window. A list of your scheduled meetings will appear on the left side of the window; select the one you want, then click Start.
To end a meeting, click End Meeting (red button) at the lower right-hand corner of the window.
Join a meeting
To join a meeting, ask the host for a shared link or meeting ID. The link can be shared via email, SMS, or IM, or posted on an authenticated website like a course Moodle page. To join a meeting by phone, ask the host for the provided telephone number and meeting ID (then press #).
Change the speakers or webcam
To change your microphone, speaker, or webcam selection, click the ^ arrows on the bottom of the screen beside audio or video, respectively. Then select Audio Settings or Video Settings to change the settings.
To learn more, visit Zoom's getting started page.
Breakout rooms
Breakout rooms allow you to temporarily split your Zoom meeting into up to 50 smaller groups. The meeting host (and co-host) can choose to split the participants of the meeting into these groups automatically or manually, and the host (and co-host) can move freely between groups. Each breakout room may be recorded and shared for viewing at a later time.
Record your Zoom meeting
In order to record your Zoom meeting, you must be the host of the meeting. Participants can record meetings through Zoom only with the host's permission. When you are in the meeting, you will see a Record button at the bottom of the window:

Once you click Record, Zoom will prompt you to record either locally (to the computer you are using for Zoom) or to the Zoom Cloud. (Please note that cloud storage is limited.) While a meeting is being recorded, you can pause or stop recording. Once you end the meeting, the recording will be converted to MP4 format and, if saved locally, Zoom will open a Finder window that contains the recording.
To share recorded class sessions with your students, contact its@reed.edu to get started with Ensemble, our streaming media server.
Note: Please ask for your students' (or other meeting participants') consent to be recorded. Post recordings of class sessions or meetings only on authenticated websites, and remind your participants not to share recordings beyond the context of the class or meeting.
Share your screen in Zoom
While in a Zoom meeting, you can share a specific window from your computer or open a whiteboard for group collaboration. If you're sharing audio or video, be sure you share your computer sound. You can also screenshare from an additional iOS device, such as an iPad.
Assign scheduling privileges in Zoom
Users are able to give others the ability to schedule meetings on their behalf. Those given scheduling privileges can manage and act as an alternative host for all meetings.
- Sign in to the Zoom web portal.
- Go to Settings → Other → Schedule Privilege.
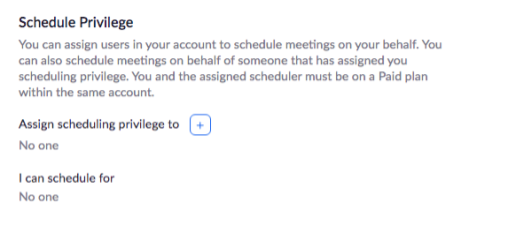
- Click the + next to Assign Scheduling Privilege To.
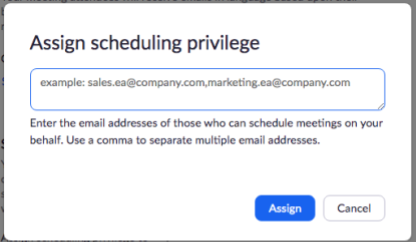
- Enter the email address(es) of the person or people you'd like to assign privileges to.
- Click Assign.
- For the privileges to go into effect, the person added must sign out and sign back in.
Schedule a meeting for another user
- Sign in to the Zoom desktop client or mobile app.
- Select the Schedule icon, then Advanced Options.

- Check Schedule For and choose the user from the dropdown menu.
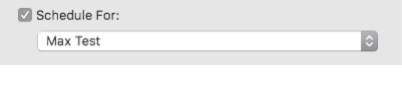
- Select Schedule to finish (or Done if using iOS).
- Sign in to the Zoom web portal.
- In the Navigation menu, click Meetings.
- Click the meeting you just scheduled.
- In the Schedule For dropdown menu, select the person you are scheduling for.
Designate a co-host or alternative host for a meeting
A Zoom Host can designate another user as either a Co-host or Alternative Host, given them more meeting management abilities than a participant. The difference between a Co-host and Alternative Host is whether they are designated before or after the meeting starts.
For a Co-host or Alternative Host to be assigned, the Host, Co-host and/or Alternative Host must have a "pro" Zoom license.
Co-host
Shares most of the controls that hosts have, allowing the Co-host to manage the administrative side of the meeting, such as managing attendees. The Host must assign a Co-host during the meeting. Co-hosts cannot start a meeting. If a Host needs someone else to start the meeting, they can assign an Alternative Host.
Alternative Host
Shares the same controls as Co-hosts, but can also start the meeting. Hosts can assign Alternative Hosts when they schedule a meeting.
Co-host/Alternative Host abilities
Co-hosts and Alternative Hosts can do these things that Hosts can also do:
- Invite and Manage Participants;
- Screen share controls;
- Record;
- Polls;
- Mute partipants;
- Manage participants;
- Manage breakout rooms
Co-host/Alternative Host limitations
Co-hosts and Alternative Hosts cannot do these things that Hosts can do:
- Create or edit polls;
- Assign someone to enter closed captions;
- End the meeting;
- Promote a participant to Host or Co-host;
- Livestream.
Assigning a Co-Host/Alternative Host
First, the Co-Host feature must be enabled:
- Sign into the Zoom Zoom web portal and go to Settings → Co-host.
- Verify that the setting is enabled. If not, click the slider to enable it. Note: If the option is grayed out, you will need to contact your Zoom administrator.
To assign the Co-host role to a participant:
- During a meeting, click Manage Participants.
- Hover over the user's name and click More.
- Click Make Co-host to make that use a Co-host.
To assign Alternative Hosts:
When you schedule a meeting--via the Zoom web portal or the Zoom application--add Alternative Hosts by email address.
- You can add Alternative Hosts via the Zoom web portal
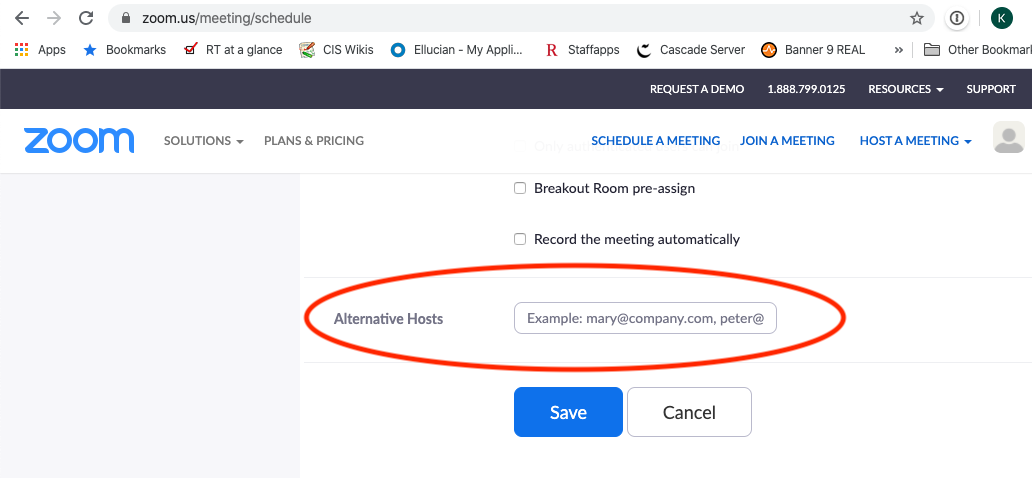
- Or via the Zoom app
Enable a chime when someone enters the waiting room
Sign into the Zoom Zoom web portal and go to Settings. Use Command-F (Mac) or Contral-F to search for item "Sound notification when someone joins or leaves", and enable it.
Alternatively, in the zoom app, you can click on "participant" on the lower tab to open the participant menu, and at the bottom-right of that participant menu, click "more", to enable a tab, scroll down and check "Play Sound When Someone Joins/Leaves".
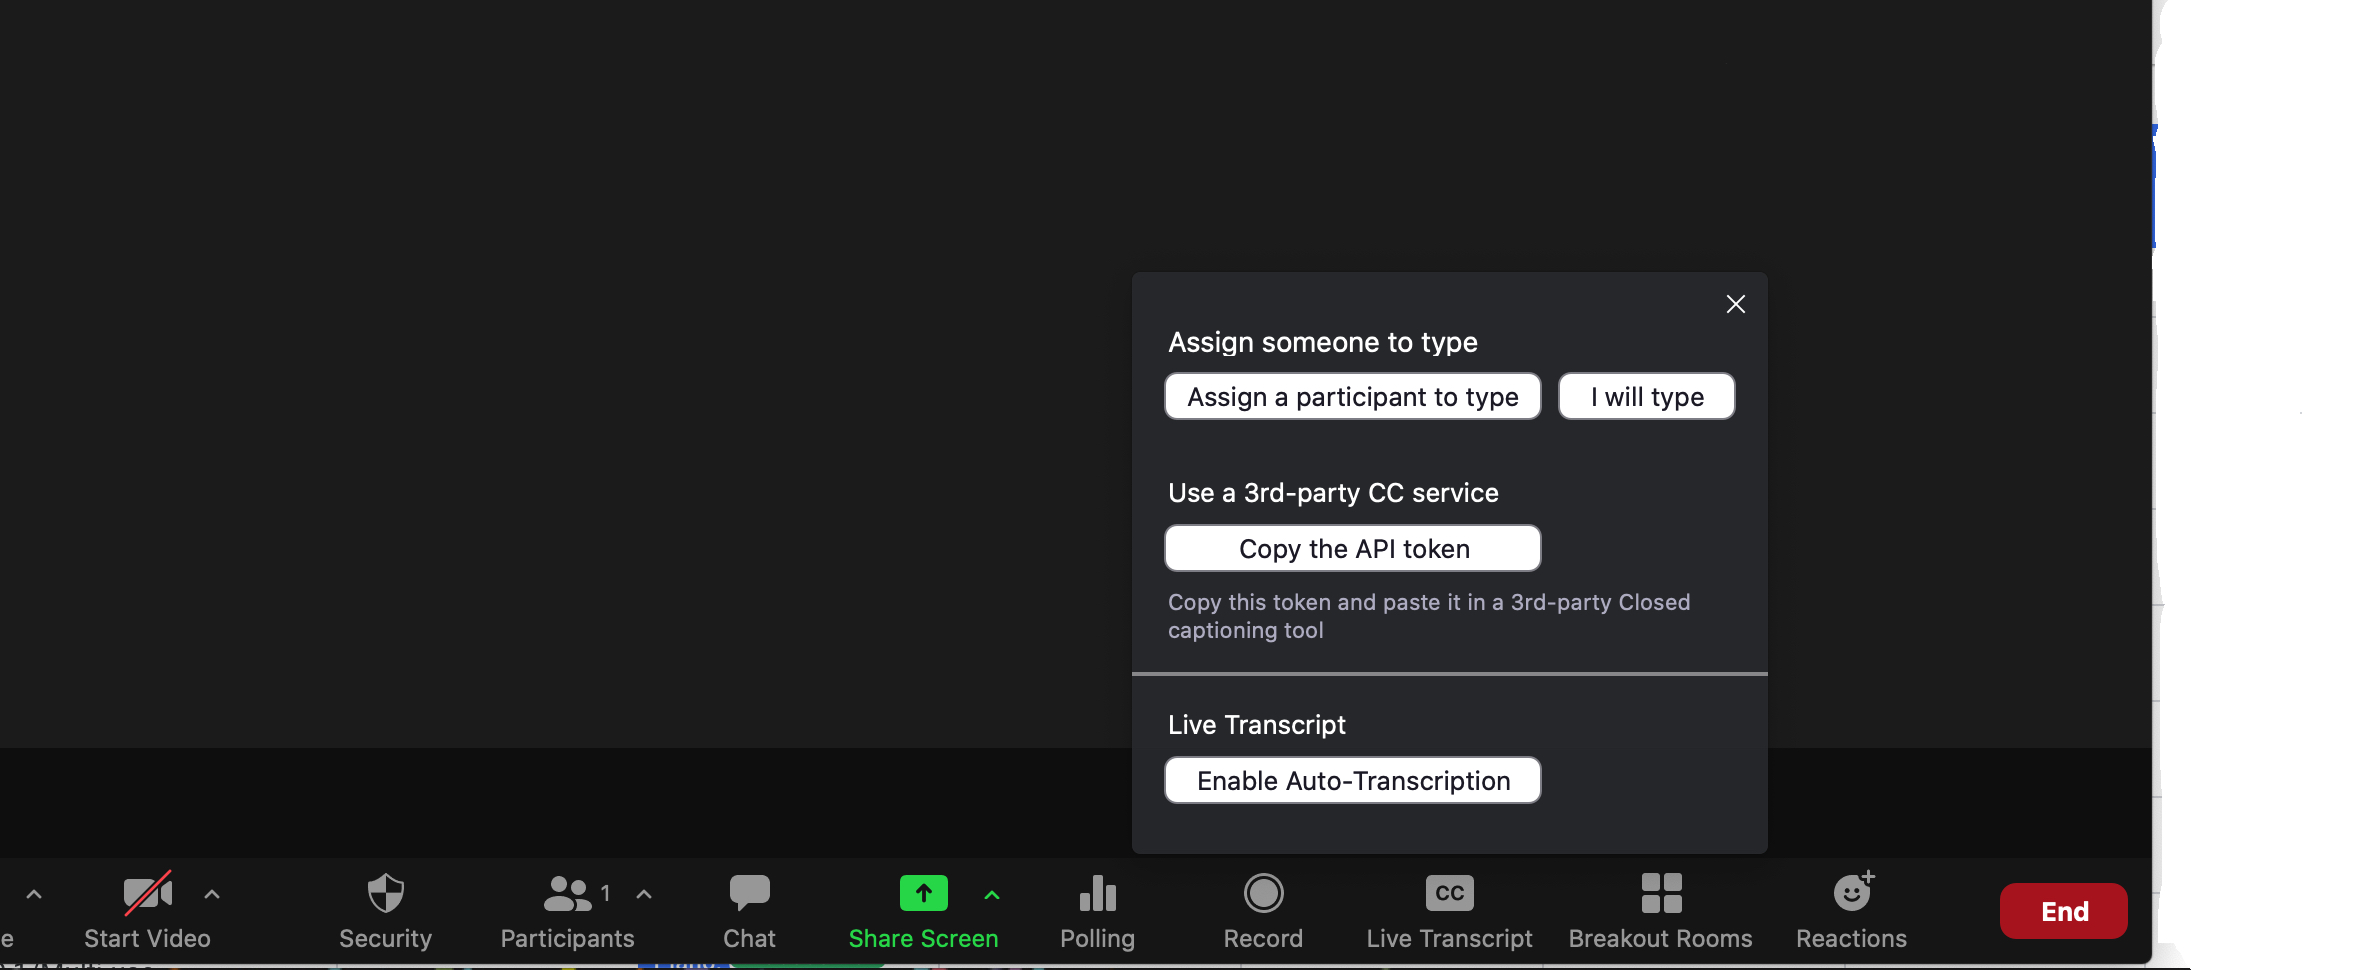
Turn on live captioning for your account and in the meeting
- Sign in to the Zoom web portal.
- In the navigation panel, click Settings.
- Click the Meeting tab.
- Verify that Closed Caption is enabled.
- If the setting is disabled, click the toggle to enable it. If a verification dialog displays, click Turn On to verify the change.
- With Closed Captioning enabled, the option to enable live transcription should appear directly below as Enable live transcription service to show transcript on the side panel in-meeting. Check this to enable live transcription.
Once live captioning is enabled, click the Live Transcript button to enable the service in your meeting.
Add your pronouns
- Sign in to the Zoom web portal.
- In the navigation panel, click Profile.
- On the right side of your name, click Edit.
- In the Pronouns field, enter your pronouns.
You have the option to choose when to share your pronouns with others in a Zoom meeting. To set this information:
In the Share in a meeting or webinar? drop-down field, choose from the following options:
- Ask me every time: You will be asked if you want your pronouns to appear next to your display name in every meeting that you host or join, and any webinars that you’re the host or panelist for.
- Always share: Your pronouns will appear next to your display name automatically in any meetings that you host or join, and any webinars that you’re the host or panelist for.
- Do not share: Your pronouns will not appear next to your display name in any meetings or webinars. You will have to manually choose to share your pronouns.
Note: Even if you choose not to share your pronouns in meetings or webinars, your pronouns will still appear in your profile card and be visible to your Zoom contacts if you have entered them in the Pronouns field.
Click save!