| Building | Room/Location | Access |
|---|---|---|
| 28 West | Behind the Dispatch Desk | Staff |
| Biology | Biology 115 | Staff/Faculty |
| Grey Campus Center | Hallway between Mail Room and Bookstore | Students, Faculty, Staff |
| Greenwood | Conference and Events Planning Office | Staff |
| Chemistry | Chem 302 | Staff/Faculty |
| Dorothy Johansen House | Kitchen | Students, Faculty, Staff |
| Eliot Hall | Eliot 210 | Staff |
| Registrar's Office | Staff | |
| Business Office | Staff | |
| Eliot 413 | Staff/Faculty | |
| Educational Technology Center | First Floor Lounge (by the fireplace) | Students, Faculty, Staff |
| Second Floor Faculty Lounge | Faculty | |
| Health and Counseling Center | Across the reception | Staff |
| Library | Library Reference | Students, Faculty, Staff |
| Library 292 | Staff | |
| Library 325; North Faculty Offices | Faculty | |
| Library 310; South Faculty Offices | Faculty | |
| Library Archives | Staff | |
| Library North Stacks | Students, Faculty, Staff | |
| Library South Stacks | Students, Faculty, Staff | |
| Library 187; Storage | Staff | |
| Performing Arts Building | Performing Arts Resource Center (PARC) | Students, Faculty, Staff |
| Physical Plant Building | Upper level | Staff |
| Prexy | Second Floor | Staff |
| Psychology | Psych 118 | Staff/Faculty |
| Vollum Hall | Vollum Lounge 1st floor | Faculty |
| Vollum 3rd floor | Faculty | |
| Studio Art Building | 2nd Floor Lounge | Staff/Faculty |
| Trillium | Trillim Classroom | Students, Faculty, Staff |
Using Xerox Copiers
Copiers are conveniently located in many buildings across campus. They are available for printing, copying, and scanning. The information below will help you learn the basic functions. Refer to our printing page to learn how to install a copier.
Copier Locations
Logging into a Copier
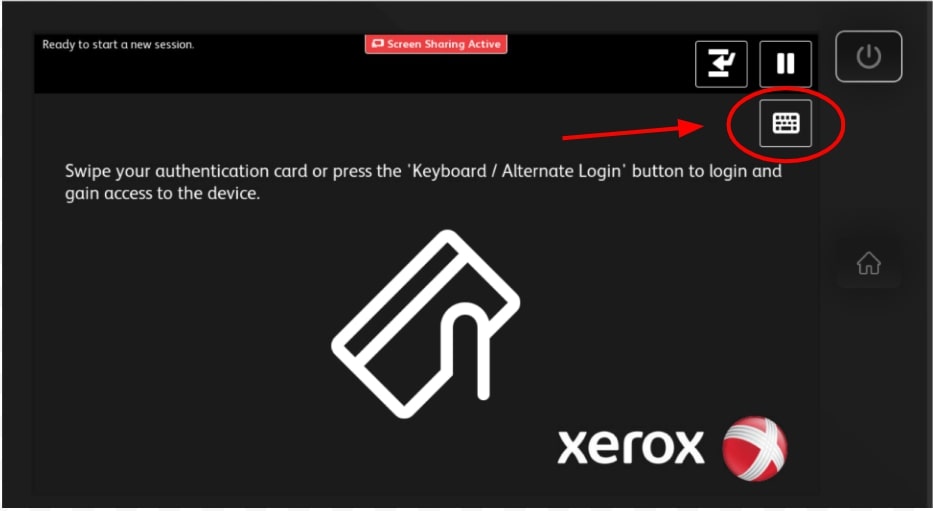
Log into the copier by either swiping your Reed ID (magnetic strip facing up) or by using the "Keyboard" button and typing your Kerberos username and password.
When you're done, tap your username in the upper left and select "Log Out" to end your session. You will also be logged out after a short period of inactivity.
Selecting an Account
Copying
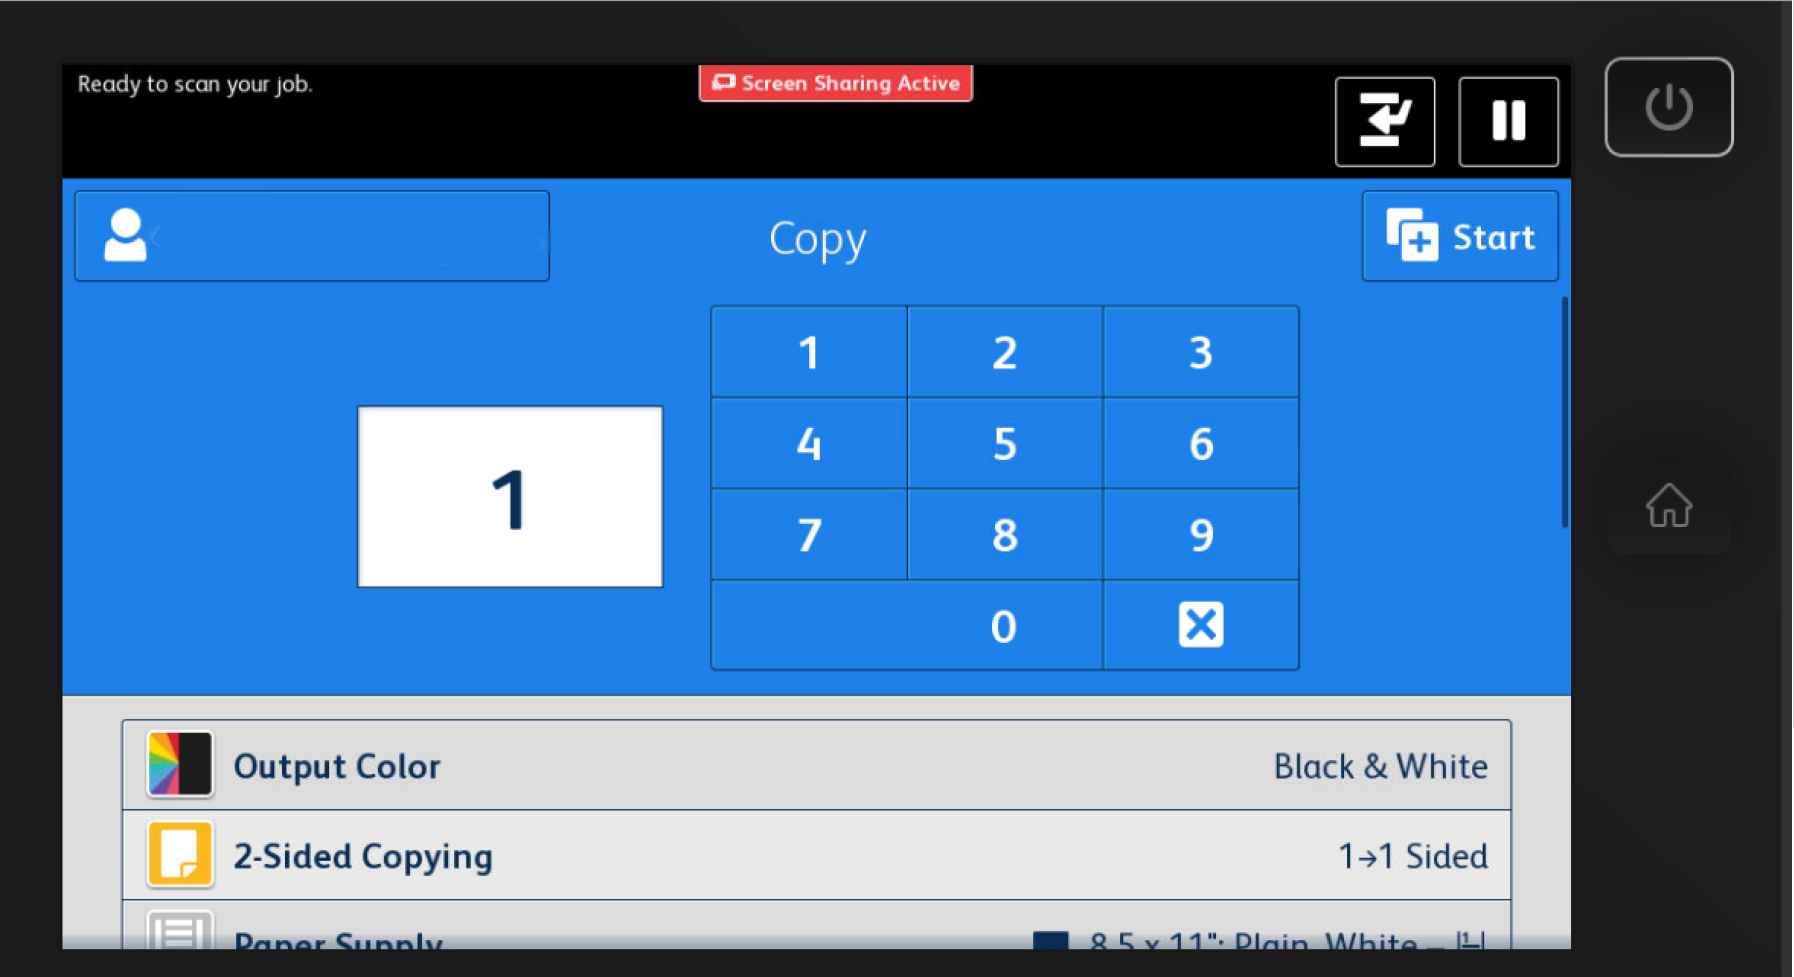
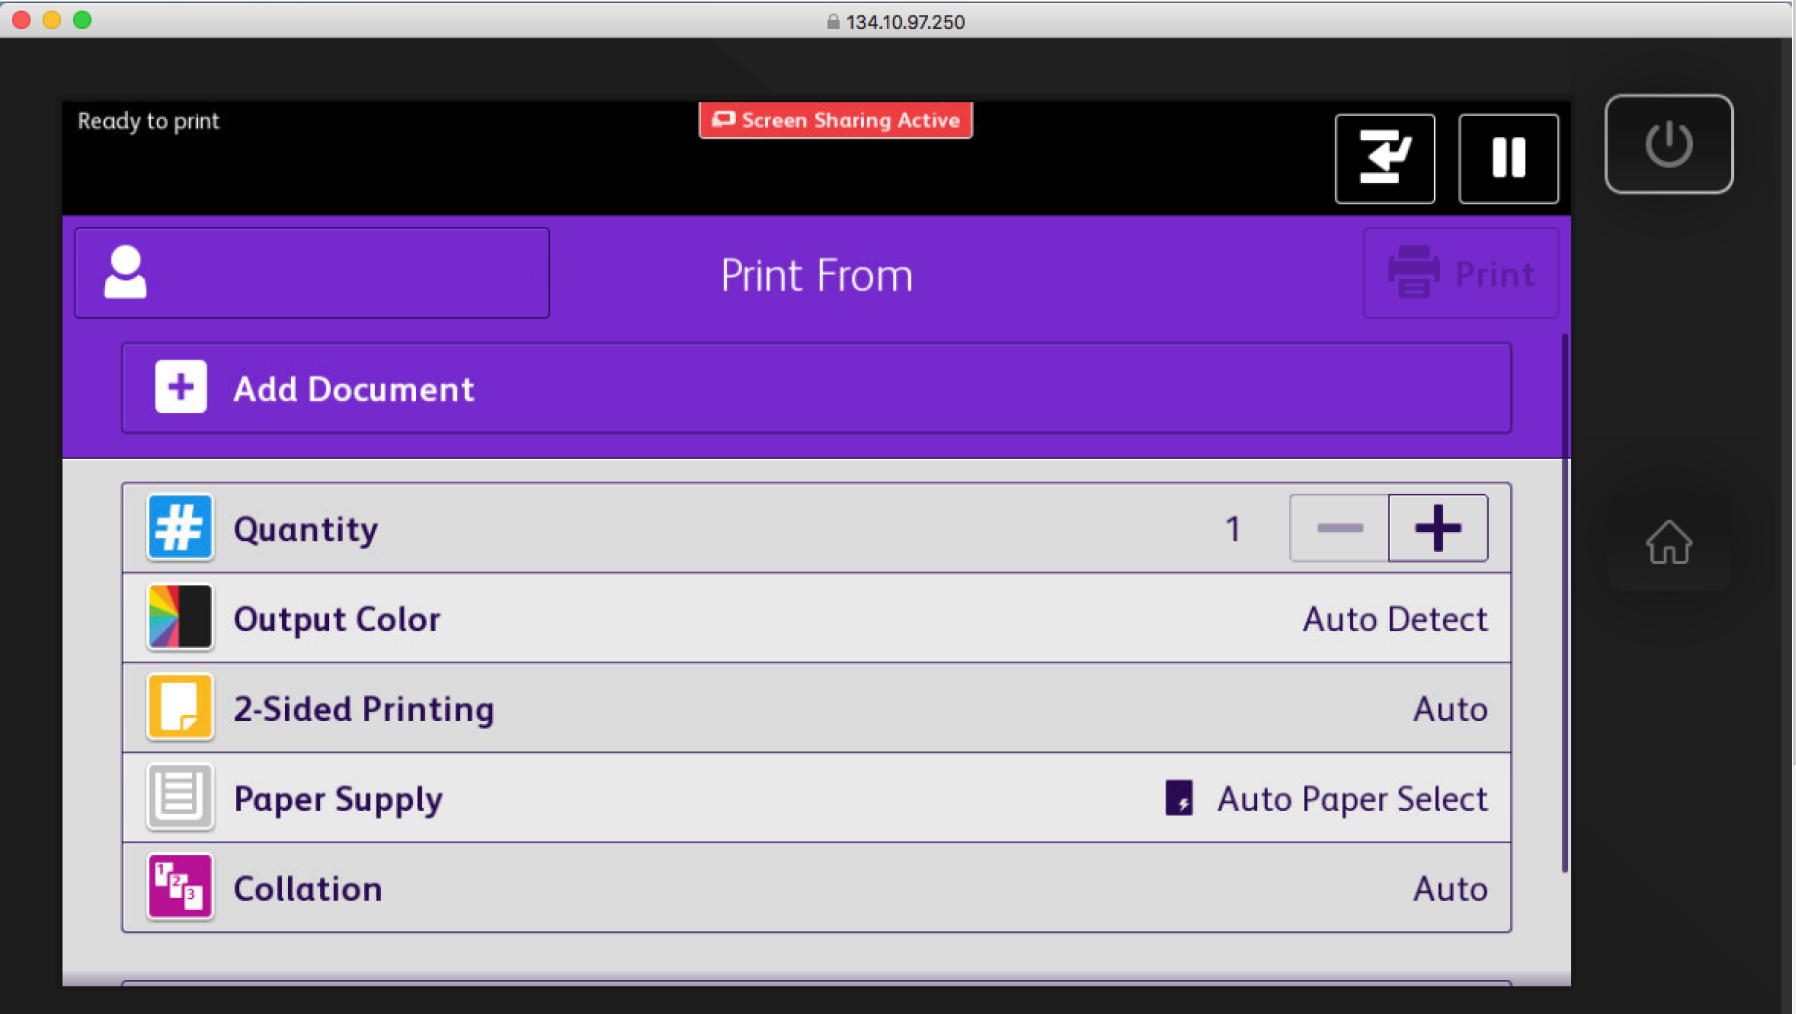
Tap "Copy" from Home. Scroll down and select the options you want for the job (e.g., color vs black/white output, 2-sided vs. 1-sided, etc.). Select the number of copies you want at the top and tap the blue "Start" button.
Scan to Email
To scan to an email address, tap "Email" > "Add Recipient", and choose one of the following options:
- You can select "Add Me” to add your email address to the Recipients list.
- Or you can select "Network Address Book" to look up anyone with a Reed email to add as your Recipient.

Once the recipients have been added, you can optionally change the subject of the email and/or the name of the file you are scanning. Scroll down and select the options you want for the job (e.g., color vs black/white output, 2-sided vs. 1-sided, etc.). Place your document on the scanner, and tap "Send" at the top right side of the screen.
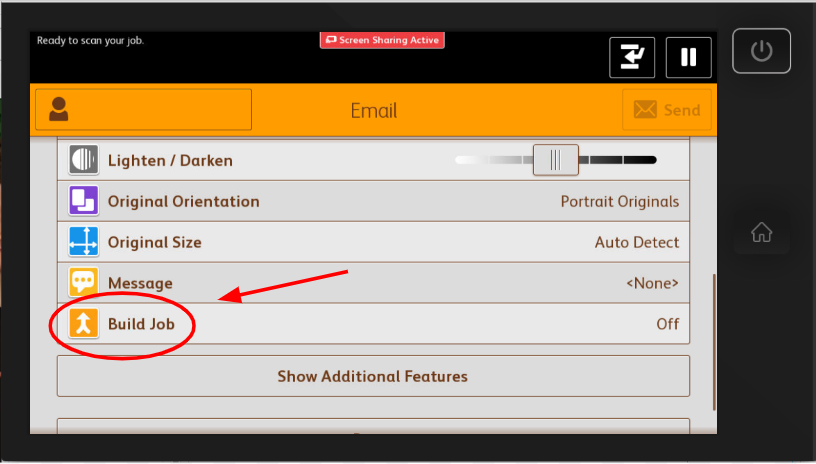
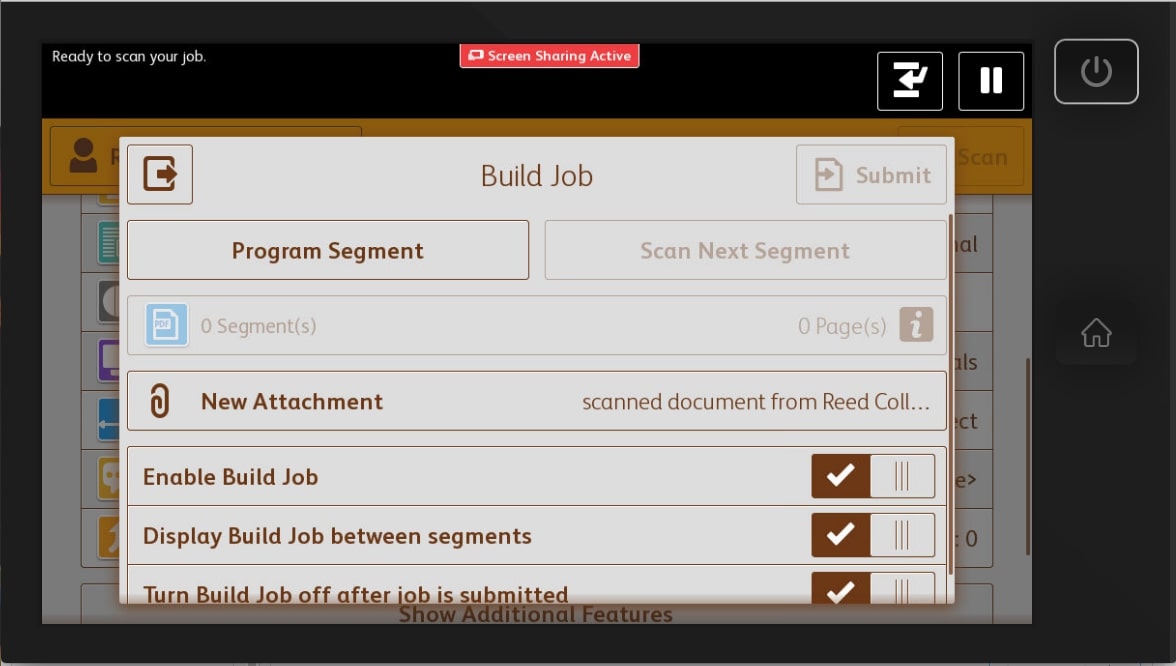
If you wish to send more than one page of scanned documents, tap "Build Job" before you click "Send". This will replace the "Send" button with a "Scan" button. Click the "Scan" button to scan your first page. After that you'll be prompted with a "Build Job" page. When you're ready to scan your next page click the "Scan Next Segment" button. Once you're done scanning, all your pages click the "Submit" button. This will send the email. There is no need to click the "Send" button after clicking the "Submit" button.
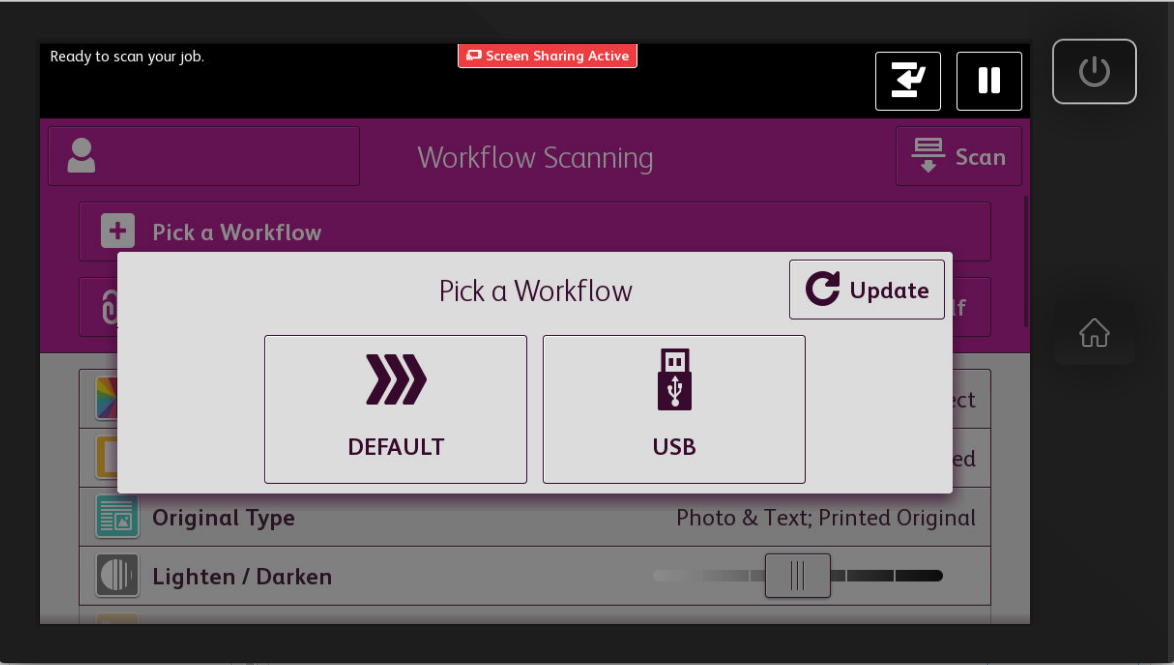
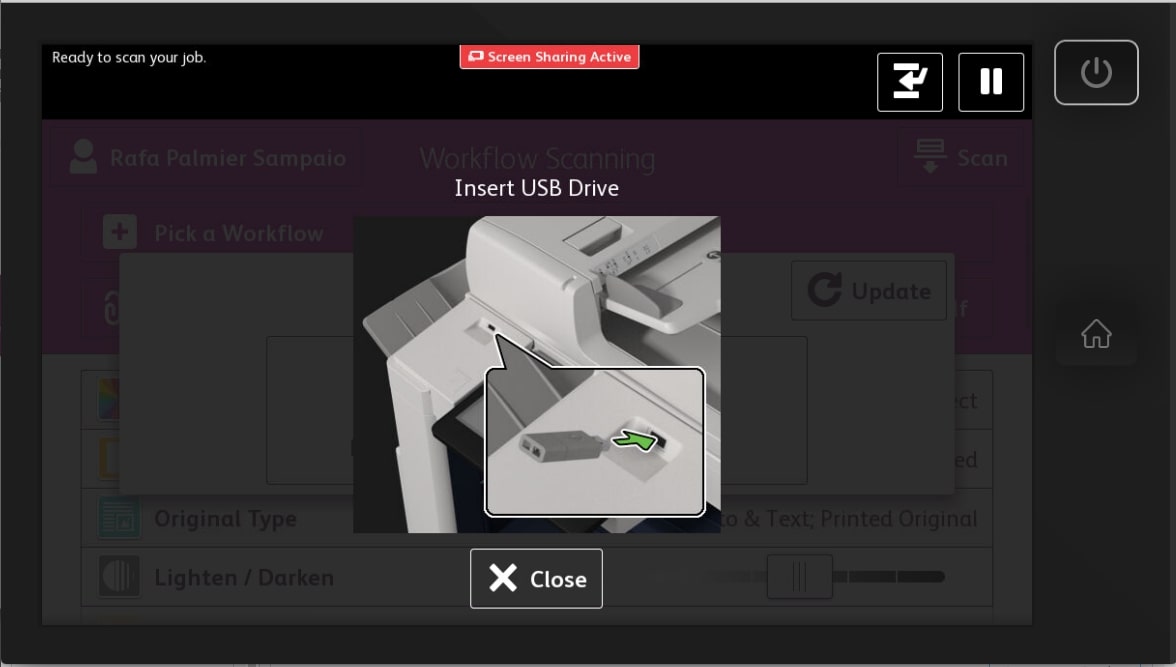
Scan to USB Drive
To scan to a USB drive, tap "Workflow Scanning" > "USB", insert your USB drive, set up your job options using the options below, and then tap the "Scan" button on the top right corner of the screen.
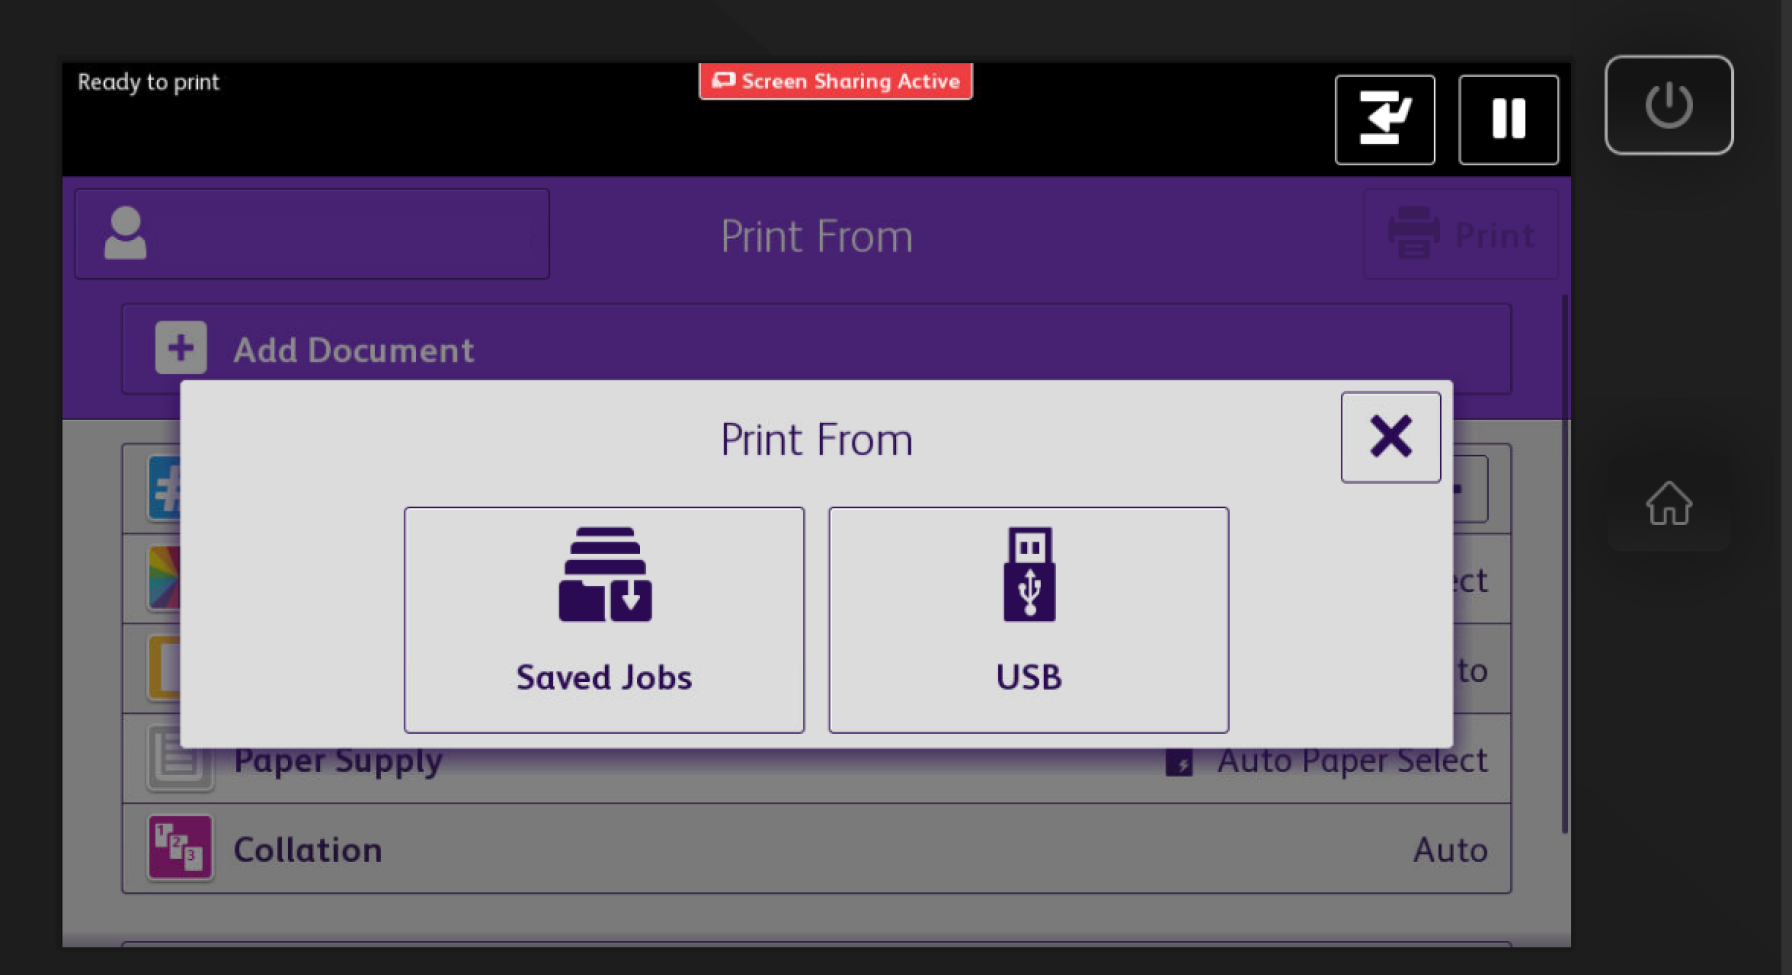
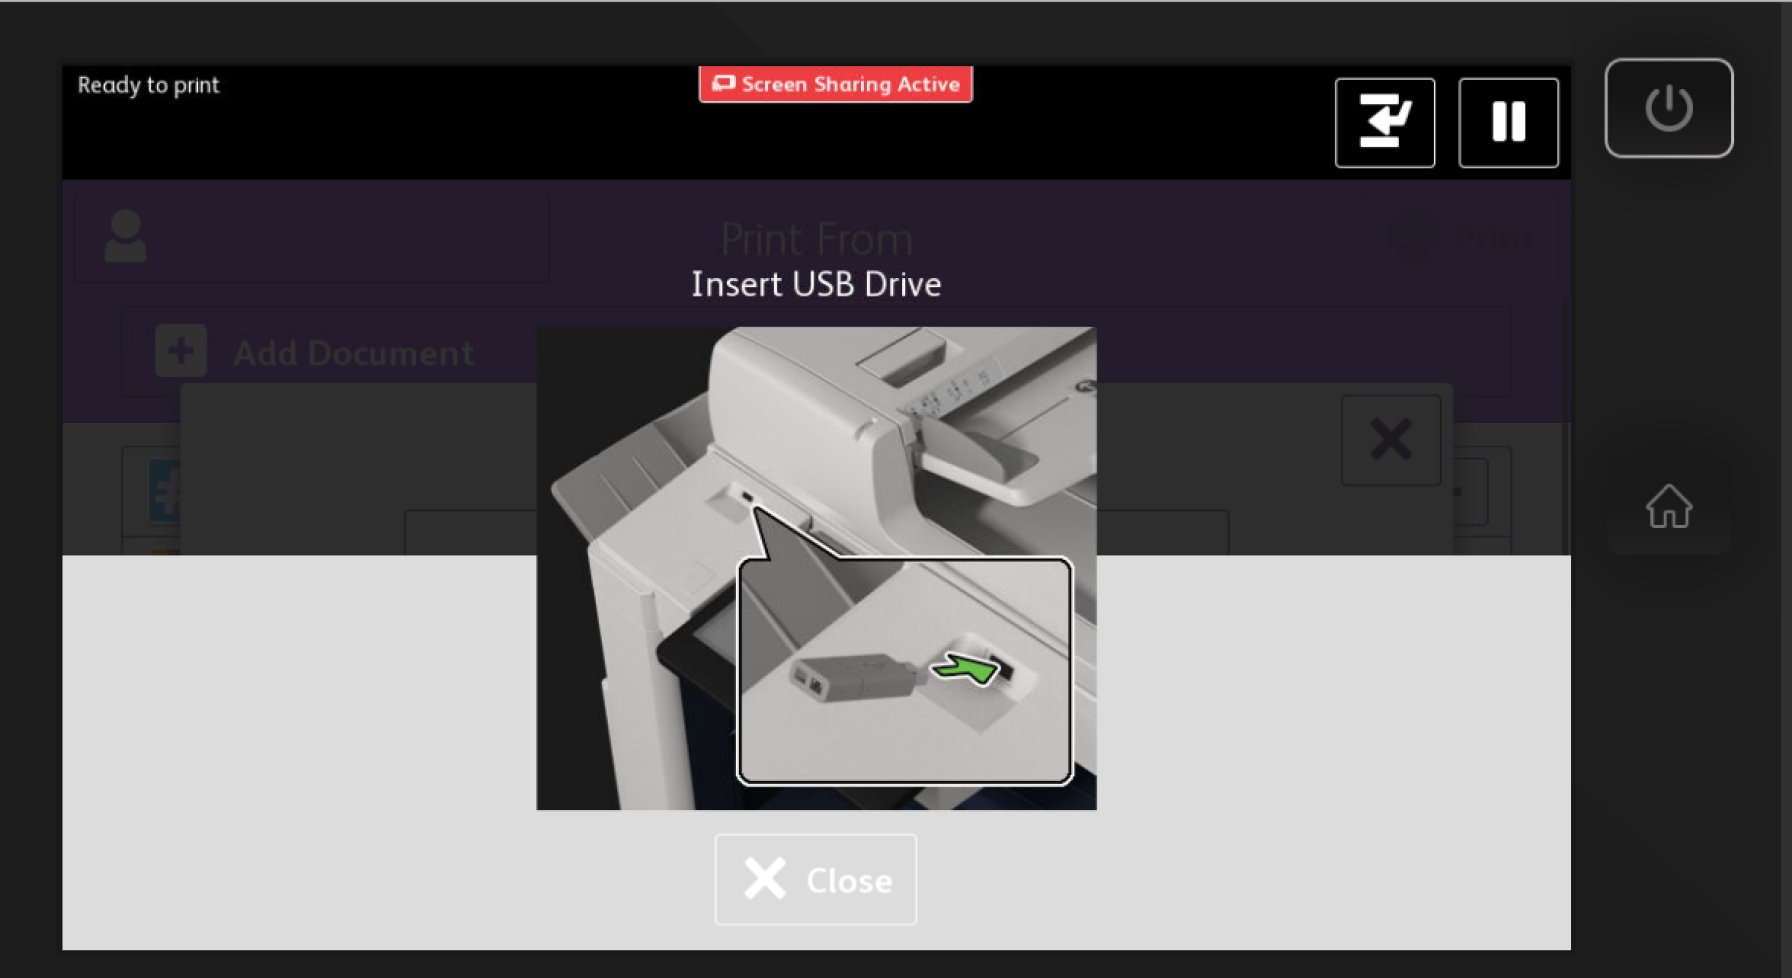
Print from USB Drive
To print from a USB drive, tap "Print from" > "USB". Insert your USB drive, set up your job options below, and then hit the purple "Print" button on the right hand side of the copier.
Scanning a Book into a Single PDF
Scanning to PDF with OCR
Printing Transparencies
- Print your desired image to a black-and-white printer.
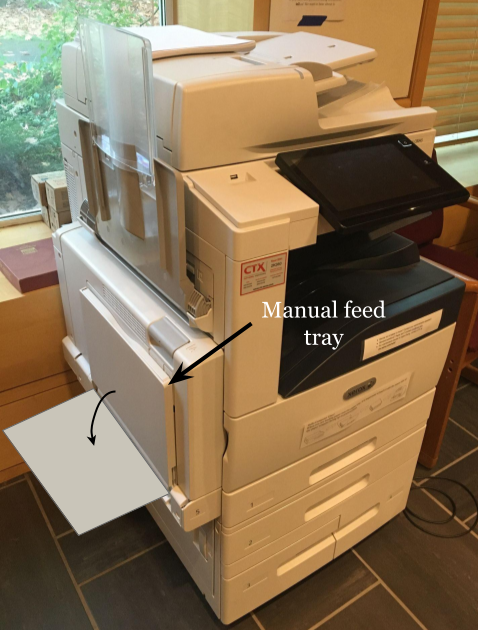
- Place transparency into the manual feed tray (see image below) with the long side going in (i.e. portrait orientation).
- When the copier detects the transparency in the tray, set the paper size to 'U.S. letter (8.5"x11")' and set the type to 'transparency'.
- Swipe into the copier and select 'copy'.
- Place your printout from Step 1 onto the scanner in the same orientation as the transparency paper (i.e. portrait).
- Select 'portrait' for the orientation of the paper in the copier settings.
- Set the feed tray to be the manual feed (it will say it has transparency paper).
- Start the copy.
- Enjoy the high quality transparency!
Troubleshooting
Having trouble with a copier? Try the troubleshooting steps below, and let us know if a problem persists!
Try turning the copier off and then on again.
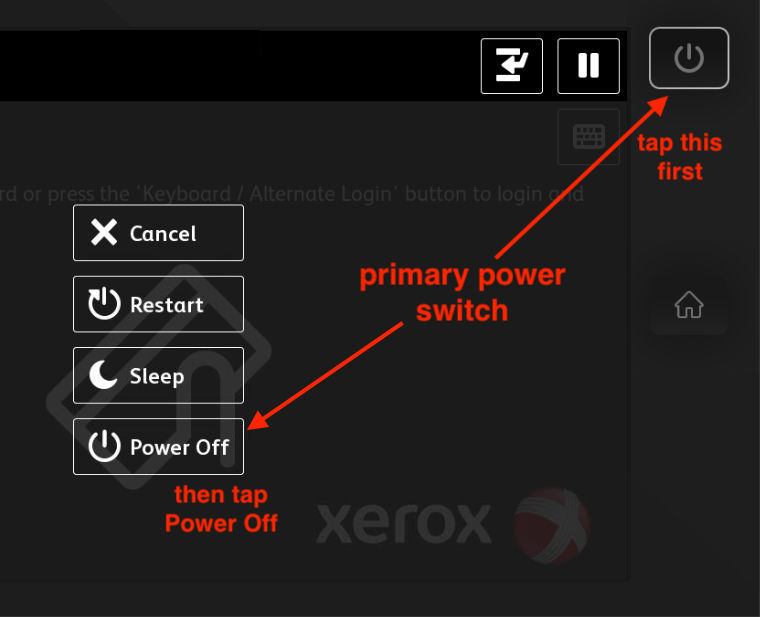
- Tap the power button on the touch panel. Select “Power Off”. Wait about 10 seconds for all the lights to dim before proceeding to step 2.
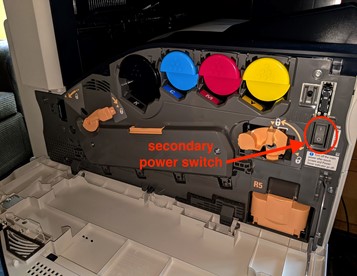
- Gently pull down on the front door of the copier, revealing the toner cartridges and a secondary power switch. Flip this switch, wait 5 seconds, then flip it back on.
- Tap the power button on the touch panel to start the machine again. The copier take several minutes to boot up.