Lists and Tables
Lists
There are multiple possible environments for the creation of lists. For unordered lists (using bullets or other symbols), use itemize, and for ordered (numbered) lists, use enumerate. There is also the description environment, which is useful for creating things like glossaries.
Anatomy of a List
The command \item creates a new line in the list. You can specify a label for that specific item by putting the label in the square brackets. For example, \item[$\ast$] marks the item with not a bullet (or number, in the case of a numbered environment) but an asterix. You can also modify the label for every item in an itemized list by putting the following right after the beginning of the environment: \renewcommand{\labelitemi}{ your label here}. Actually, the \labelitemi refers to the first level of the list. If you are using nested lists and want the second layer to change, use \labelitemii instead, and for the third, \labelitemiii.
Bulleted (Unordered)
The most common unordered list uses the itemize environment. As mentioned above, each item begins with the \item command, and you can change labels by utilizing the square brackets or using \renewcommand{\labelitemi}{ your label here}.
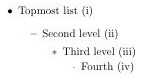
Here's an example of a default list:
\begin{itemize}
\item Topmost list (i)
\begin{itemize}
\item Second level (ii)
\begin{itemize}
\item Third level (iii)
\begin{itemize}
\item Fourth (iv)
\end{itemize}\end{itemize}\end{itemize}\end{itemize} Enough \end commands to complete the nesting
That creates the following:
Numbered
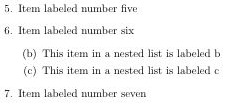
Numbered lists utilize the enumerate environment. The default numbered list begins at 1, but you can modify that with the \addtocounter command. To make a numbered list start at 5, put \addtocounter{enumi}{ 4} right after \begin{enumerate}. To change the counter for a nested list, replace enumi with enumii or enumiii, as seen below. The second nested numbered list will actually be labeled with letters, and the third with lower case Roman numerals.
\begin{enumerate} \addtocounter{enumi}{4}
\item Item labeled number five
\item Item labeled number six
\begin{enumerate} \addtocounter{enumii}{1}
\item This item in a nested list is labeled b
\item This item in a nested list is labeled c
\end{enumerate} \item Item labeled number seven
\end{enumerate}
That creates the following:
Descriptive Lists
If you would like each list item to have two parts, such as in a glossary or the following example, use the description list environment and place the desired list item in square brackets. Here's the source example:
\begin{description}
\item[Austria] The Republic of Austria is a landlocked country in Central Europe, a federation of nine states. Austria is bordered by Germany and the Czech Republic to the north, Slovakia and Hungary to the east, Slovenia and Italy to the south, and Switzerland and Liechtenstein to the west.
\item[Luxembourg] The Grand Duchy of Luxembourg (also Luxemburg) is a landlocked country in north-west Europe, bordered by France, Germany and Belgium.
\item[Andorra] Principality of Andorra is a very small landlocked principality in southwestern Europe, located in the eastern Pyrenees mountains between France and Spain. Once isolated it is currently a prosperous country mainly because of tourism and its status as a tax haven.
\end{description}
| Austria | The Republic of Austria is a landlocked country in Central Europe, a federation of nine states. Austria is bordered by Germany and the Czech Republic to the north, Slovakia and Hungary to the east, Slovenia and Italy to the south, and Switzerland and Liechtenstein to the west. |
| Luxembourg | The Grand Duchy of Luxembourg (also Luxemburg) is a landlocked country in north-west Europe, bordered by France, Germany and Belgium. |
| Andorra | Principality of Andorra is a very small landlocked principality in southwestern Europe, located in the eastern Pyrenees mountains between France and Spain. Once isolated it is currently a prosperous country mainly because of tourism and its status as a tax haven. |
Adjusting the Spacing
You may wish to modify the spacing of the list. You can do this by using the \addtolength command: \addtolength{\itemsep}{ -0.5\baselineskip}. If that doesn't change it as much as you want, then change the -0.5 to a more negative number. Conversely, if you want to increase the spacing, change -0.5 to be more positive.
Tables
The tabular environment is used to make tables. When you want to also use table captions or have the table show up in a table of contents, you will want to nest the tabular in a table environment. The table environment is a floating environment, meaning that it can move around in the document to where it fits best. The figure environment is very similar to the table environment, so for more information about positioning tables, check out the graphics page.
If you are interested, TeXShop (v.2.019d) has an editor for tabular and matrix environments that is similar to a WYSIWYG editor's spreadsheets. LaTable is a separate application that has a similar function. However: these are not alternatives to learning how to do tables. LaTable adds awkward markup that makes even slightly complex tables difficult to modify. So if you have a very basic table or find the editors useful, go ahead and use them. But it would be helpful to familiarize yourself with the following documentation in case you need to alter the table's layout. Most LaTeX editors have macros to help build and modify tables, which you may find quite beneficial.
Right after you start the tabular environment, you will need to specify how many columns are in the table: \begin{tabular}{ column setup}. For each column, you put a c, l or r for cell contents that are aligned in the center, left or right of the column, respectively. If you want vertical lines, put a pipe (|, found above the backslash character) in between the alignment letters.
Now you need to fill in the rows. Each row ends with a linebreak (two backslashes) and the cells are delineated by ampersands (&). It is important to have enough ampersands to delineate every cell, even if a cell is empty. (In such a case, do not write anything in between the ampersands.)
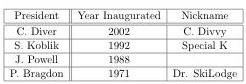
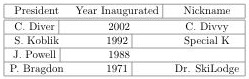
Here is a really basic table:
\begin{tabular}{|c||c|c|}
\hline
President & Year Inaugurated & Nickname\\
\hline \hline Makes two lines
C. Diver & 2002 & C. Divvy\\
\hline
S. Koblik & 1992 & Special K\\
\hline
J. Powell & 1988 & \\ Note the extra & to leave an empty cell
\hline
P. Bragdon & 1971 & Dr. SkiLodge\\
\hline
\end{tabular}
That creates this:
Using the tabular environment to create tables may seem overwhelming at first. I recommend that you sketch out the table to give yourself a reference if you get lost, at least while you're beginning. Also, if you have the \begin and \end environment all set up, you can typeset the document to look at your progress.
Table Troubleshooting
A quick note about troubleshooting tables: When you typeset a file, a console will make note of the typesetting process. If the barrage of gibberish (most of which you can ignore) stops and no PDF shows up, then take a look at the console to see what error you have. Here are some common errors for tables and what they mean:
Extra alignment tab has been changed to \cr: Your row(s) contains too many columns as dictated when you first started the table. Add a column (up near the \begin{tabular}) or find the extra cell data.
Undefined control sequence: Your command is misspelled or you forgot the necessary package.
(visual) Your typeset table has no vertical line for one row: You didn't finish entering the data for that row! Insert another ampersand (&) to finish it off.
You can find out more about troubleshooting LaTeX in the Advanced LaTeX section.
Lines, Horizontal and Vertical
If you want a horizontal line between rows, write \hline after the linebreak. For slightly thicker lines, you can use \toprule and \bottomrule, as long as you include the package booktabs in the preamble. (See the above example table for use of \hline, and below for use of \toprule and \bottomrule.)
In biology (and maybe other sciences), tables are not supposed to have vertical lines or many horizontal lines. Luckily, all the lines are optional. Here is an example of an ANOVA table used in a biology thesis:
\begin{tabular}{c c c c c c c c}
\toprule
& Sample & df & N & SS & F & p-value & \\
\hline \hline
& Illinois North & 2 & 225 & 65.664 & 10.127 & $<$0.0001* & \\
& Illinois South & 2 & 271 & 71.998 & 11.923 & $<$0.0001* & \\
& Colorado West & 2 & 12 & 15.000 & 2.813 & 0.1125 & \\
& Colorado East & 2 & 14 & 13.524 & 2.374 & 0.1390 & \\
\bottomrule
\end{tabular}
That creates this:
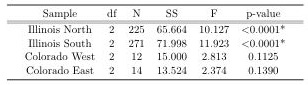
Note that there is one extra column on either side of the data. That is to make the horizontal lines extend past the filled cells and give it a slightly more polished look. To make a horizontal line extend only partially across the table, use \cline{ cells} instead:
\begin{tabular}{|c||c|c|}
\hline
President & Year Inaugurated & Nickname\\
\hline \hline
C. Diver & 2002 & C. Divvy\\
\cline{1-2}
S. Koblik & 1992 & Special K\\
\cline{2-3}
J. Powell & 1988 &\\
\cline{2-2}
P. Bragdon & 1971 & Dr. SkiLodge\\
\hline
\end{tabular}
That creates this:

Vertical lines that go the entire height of the table are defined in the tabular declaration (the vertical bars, called pipes, using the backslash key). If you want a vertical line to go only the height of the cell, use \vline:
\begin{tabular}{|c c c|}
\hline
President & Year Inaugurated \vline & Nickname\\
\hline \hline
C. Diver \vline & 2002 & C. Divvy\\
\cline{1-2}
S. Koblik & 1992 \vline & Special K\\
\cline{2-3}
J. Powell \vline & 1988 &\\
\cline{2-2}
P. Bragdon & 1971 \vline & Dr. SkiLodge\\
\hline
\end{tabular}
That creates this:
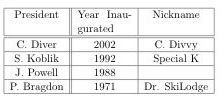
Controlling Column Width
Because columns in LaTeX are only as wide as the cell with the most data, you will probably want to be able to force a column to be a certain width. This can be done where you determine the number and alignment of columns. Instead of a c, l or r, put p{ width}, making sure to specify the width in curly braces. It's probably easiest to define the width in terms of em (the width of a capital M in the current font), but you can read about other methods of measurement in LaTeX here. The text in the cells will now wrap to fit the width. The text will also be left aligned, but you can change that by placing \centering in front of every data that you want centered. (Similarly, \raggedleft will align the text on the right, but will not hyphenate.)
\begin{tabular}{|c|| p{5em} |c|}
\hline
President & Year Inaugurated & Nickname\\
\hline \hline
C. Diver & \centering 2002 & C. Divvy\\
\hline
S. Koblik & \centering 1992 & Special K\\
\hline
J. Powell & \centering 1988 &\\
\hline
P. Bragdon & \centering 1971 & Dr. SkiLodge\\
\hline
\end{tabular}
That creates this:
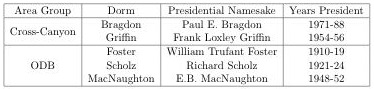
Cells That Span Multiple Rows
Sometimes you will want a cell to be x rows high, and cells to the right to be the normal height. For this, you will use the \multirow package and command:
\multirow{ height in # rows}{ width of first column}{ contents of first column} & Contents of next cells \\ & Contents of next row of cells\\ If you want the first column to be as wide as necessary, insert an asterix as the width, no units necessary.
\begin{tabular}{|c|c|c|c|}
\hline
Area Group & Dorm & Presidential Namesake & Years President\\
\hline
\multirow{2}{*}{Cross-Canyon} & Bragdon & Paul E. Bragdon & 1971-88\\
& Griffin & Frank Loxley Griffin & 1954-56\\
\hline
\multirow{3}{*}{ODB} & Foster & William Trufant Foster & 1910-19\\
& Scholz & Richard Scholz & 1921-24\\
& MacNaughton & E.B. MacNaughton & 1948-52\\
\hline
\end{tabular}
That creates this:
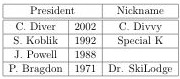
Cells That Span Multiple Columns
You might want a cell to go across multiple columns, or for a column to be subdivided in subsequent rows. For that you will use \multicolumn with the multirows package. It works much in the same way as the multirow command:
\multicolumn{ # of columns to span}{ alignment of cell}{ contents of cell}
\begin{tabular}{|c|c|c|}
\hline
\multicolumn{2}{|c|}{President} & Nickname\\
\hline \hline
C. Diver & 2002 & C. Divvy\\
\hline
S. Koblik & 1992 & Special K\\
\hline
J. Powell & 1988 & \\
\hline
P. Bragdon & 1971 & Dr. SkiLodge\\
\hline
\end{tabular}
That creates this:
Exporting Excel Tables to LaTeX
It is honestly easiest to make a PDF of your Excel file and insert the cropped PDF using the Figure environment. You'll need to move the \caption above the \includegraphic, but if you have an extensive or complicated table, or the majority of your tables are in Excel, then cropping a PDF is your best solution.
If you have a small, uncomplicated table and a bit of patience, then you can select the contents of the table in Excel and copy-paste it into a new table environment in your LaTeX editor. Then insert formatting like \\ and & until it looks how you want.
Long Tables
If you have an extra-long table, one that will spill onto a second page, you will need to use the longtable environment, not the tabular. Make sure you are using the longtable package (\usepackage{longtable} appears in the preamble), which should be installed already in your LaTeX setup. The skeleton of a long table looks like this:
\setlongtables % keeps the width uniform across both pages
\begin{longtable}{|c|c|c|c|} the start of the longtable environment
\caption{Spurred species and their pollinators}\\ table caption
\hline
Flower species & Pollinator species & Family & Functional Group \\ header, topmost row of table on all pages
\endfirsthead the table caption goes only on the first page, and my header wouldn't show up on the first page unless I put it here.
\hline
Flower species & Pollinator species & Family & Functional Group \\ my header, appears on both pages
\endhead to make it appear on both pages
\hline \hline Puts a double horizontal line under the header
{\it Aquilegia canadensis} & {\it Trochilus} & Trochil. & Bird \\ the contents of the first row
...lots of rows..
{\it Habenaria leucophaea} & {\it Chaerocampa} & Sphing. & Lepidoptera \\ the contents of the TABLE'S final row
\hline
\end{longtable} to end the table
Long tables can be tricky, but the result can look quite sharp and sometimes, it's not possible to condense a table enough to fit on one page. If you are running into trouble with getting the table to appear correctly, make sure that you aren't in the table environment, which causes the table to float. Also, LaTeX makes its own decisions as to where the table is broken for the next page. The breaking formula makes a new page after about 20 rows, so if you are using any cells that span multiple rows, this may make your table spill out of the margins or just not show up at all. Try putting \setcounter{LTchunksize}{#} in the preamble, replacing # with the number of effective rows before the pagebreak. Alternately, you can force a pagebreak with the \pagebreak command, just put \pagebreak wherever you think the table should be broken.