LaTeX Installation
The fastest and easiest way to start using LaTeX is to through an online LaTeX editor. Alternatively, you can install LaTeX on your computer. If you decide to install LaTeX you'll need to set aside an hour of your time. You should also be on campus or using a high-speed internet connection, since you will have to download large files. You need to install two different parts, LaTeX customized for your operating system and an editor. LaTeX is free, but some editors ask for a nominal fee after a certain amount of use (such editors are known as shareware). We have recommended free editors for each operating system, but feel free to explore other options for editors. For both Windows and macOS, users already comfortable with Emacs or vim can use it as their LaTeX editor.
Online LaTeX Editors
Installing LaTeX along with an editor can be a time-consuming, difficult and frustrating process. Fortunately, in the last few years, several excellent browser-based LaTeX editors have been developed. These online editors require no installation, use cloud-based storage and allow multiple authors to easily collaborate on the same document. Most also have useful features such as spell check and auto-complete built in. For most users we recommend ShareLaTeX. Some alternatives include Overleaf and Authorea. All three of these LaTeX editors are free but some features such as multiple coauthors and Dropbox integration require a paid subscription. In general using these editors is as simple as creating an account. If you're new to LaTeX, useful documentation can be found here.
macOS Installation
- Download the MacTeX installer from The TeX Users Group (it's large--more than 2 GB--so be prepared to wait a bit).
- When the file titled MacTeX.dmg has finished downloading, open it up, and then open the file called MacTeX.pkg, the MacTeX Installer.
- Agree to the Installer package and walk through the installation program. When the installation is complete, click okay.
- Your new LaTeX arsenal is in /Applications/TeX:
- TeXShop is a widely used LaTeX editor. The main TeXShop page has a help page and much of this LaTeX documentation makes specific reference to the TeXShop interface. But, the basics :
- Open a new (or preexisting) .tex file and write your document.
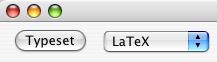
- When you want to typeset it (turn it into a pdf that can be read by users without a LaTeX editor), click the Typeset button in the top left hand corner of your document window. Make sure that the adjacent dropdown menu says LaTeX, meaning that's what language TeXShop will expect to use while typesetting. (If something else is selected instead, TeXShop's engine won't be expecting certain commands.)
- While TeXShop is creating your pdf, a new window called a console will appear. This spews gibberish that may make more sense to you as you learn to use LaTeX, but usually isn't important unless the gibberish stops and the console says that you have an error. If this happens, consult the troubleshooting section of our documentation.
- You can print this pdf straight from TeXShop, or open it up in any application that can handle pdfs (such as Preview or Adobe Acrobat). This part of TeXShop acts very much like said other applications in that you can scroll through the pages of your document and zoom in using the magnifying glass.
- You may want to ascertain that the MacTeX installer has given you the most recent versions of these applications by comparing the version numbers on your copies with the versions given on the respective sites.
- TeXShop is a widely used LaTeX editor. The main TeXShop page has a help page and much of this LaTeX documentation makes specific reference to the TeXShop interface. But, the basics :
- Enjoy your new LaTeX installation! Head over to the Introduction to LaTeX page to get started.
Windows Installation
This installation has two parts: installing MikTeX and installing TexMaker (the editor).
Downloading and Installing MiKTeX
- Go to the MiKTeX download page. Click on the latest MiKTeX download link. On the next page, scroll down and click on the Download button for Basic MiKTeX.
- Double-click the file basic-miktex-[...].exe on your desktop. After the files are extracted, you will be presented with the welcome page.
- Read and accept the conditions by checking the box. Click Next.
- Choose if you want MiKTeX to be used by all users on your computer or just you. Click Next.
- Specify the location for MiKTex to be installed. By default it installs to C:\Program Files\. Click Next to continue.
- Change preferred paper to Letter (instead of A4). Leave the default to Ask me first for installing missing packages. Click Next.
- Review the settings. Click Back if you want to change the settings. Click Start to begin the installation process.
- Two progress bars indicate the progress of the installation process. Click Next when the installation is complete.
- You will see the final wizard page. Click Close to close the wizard. LaTeX is now installed on your machine.
Installing TexMaker
You have an array of choices for your LaTeX editor, but we recommend TexMaker, which is free and commonly used.
-
- Download the installation package for windows.
- Run the installer.
- TexMaker should be installed now.
- Enjoy your new LaTeX installation! Head over to the Introduction to LaTeX page to get started.