Tech Tips
Showing all tips
Accessible PDF text
Some PDF documents are not accessible because they contain text that is not recognizable to a computer. These documents will not work with screen readers or text-to-speech software.
- If you're not sure whether your PDF is accessible, try using your cursor to select text. If you cannot select a line of text, your file is not accessible.
- Use SensusAccess, Reed's accessible document converter, to improve your PDF. Request an accessibility conversion in the Tagged PDF (text over image) format.
- Note: Using SensusAccess does not guarantee that your document is completely accessible, but it's an important first step in ensuring access.
Bulk editing Moodle content
Move, copy, or hide Moodle content by first turning on Edit mode, if it isn't already on for your course. Select the Bulk edit option at the top of the page, choose the items you want to change, then select the appropriate option.
Add a Moodle course image
Course images are displayed in the My Courses and Dashboard areas of Moodle. To add a course image, choose the Settings menu at the top of your course page. Scroll down to the Description section; in the course image area, click on the arrow icon and select a file for your course. Or, drag and drop an image from your computer onto the arrow icon. Course images should be 300 pixels wide by 110 pixels tall.
Find your Moodle courses
Click on the My courses link at the top of any Moodle page to find your Moodle course pages. Filter by viewing all the courses, or view courses that are in progress, upcoming, or completed. You can also view any starred, or favorite, courses.
Or, you can click on the Dashboard link at the top of any Moodle page to view recently accessed Moodle courses.
My Courses in Moodle
My Courses displays all your Moodle courses. Filter by viewing all the courses, or view courses that are in progress, upcoming, or completed. You can also view any starred, or favorite, courses.
Turning on Edit mode in Moodle
When you are working on your Moodle page, turn ion editing to add, edit, or move Moodle content in your course. The Edit mode button is found at the upper right of your screen.

Add content in Moodle
To add content on a Moodle page, turn on the Edit mode by clicking the button at the upper right of your screen. A red + button will appear when the mouse hovers over areas; click on the + button and add your activity or resource. Content can be moved by clicking on the item and dragging it to a new location. Read more about adding content in Moodle.
Collapse/Expand Moodle sections
To collapse or expand a section of a Moodle page, click on the Collapse all or Expand all button.
Course visibility in Moodle
Moodle courses are made available the Friday before classes start, or you can arrange a time with Instructional Technology Services to make it visible before or after this date. You are also welcome to make the course visible when it's ready for your students by following these steps.
- To make your course visible, go your course and choose the Settings option.
- In the General section, change the “Course visibility” option from “Hide” to “Show.”
- Scroll down to the bottom of the page, and click the “Save and display” button.
Show/hide weeks or content in Moodle
Collapse or expand all weeks or topics in a Moodle course by clicking the "expand all" or "collapse all" link.
Show Panopto video tools in Moodle
When viewing a video embedded in Moodle, view the video tools by clicking the downwards pointing arrow icon, located in the bottom-middle of the video player. You can then access the video captions, add notes, view chapter markers, and view more information about the video.
Switch Panopto video views in Moodle
When viewing a video embedded in Moodle, you can switch views by clicking on the switch stream icon from the upper right-hand corner. The video switch feature is enabled for those videos which have two video stream views.
Add pronouns to your Zoom profile
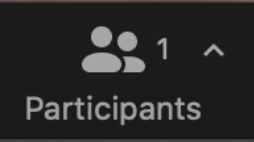
Where are my Zoom attendees?!
Where are my students?! Zoom meetings now require Passcodes or Waiting Rooms. If you find yourself all alone in the meeting, your students may be patiently waiting in the waiting room! Click the Participants button to see who is in the waiting room and to let them in!
Tips for remote orals
Zoom keyboard shortcuts
Zoom Waiting Room
How to clean your computer/phone/tablet without damaging it
Do:
- Shut off the device and unplug it from the power adapter before cleaning
- Use a soft, lint-free cloth
- Spray cleaning product on cloth until slightly damp (1-2 sprays)
Recommended Products:
- Microfiber cloth (or a cloth as gentle as one you would use to clean eyewear) to avoid scratching the screen
- Non-ammonia based glass cleaner or isopropyl alcohol to avoid warping the screen
- Multipurpose cleaner in a spray bottle or Clorox wipes for areas other than the screen
Don't:
- Spray cleaning product directly onto the computer
- Put too much pressure on the screen or keys
- Expose the device to excessive moisture
- Use products that contain ammonia on the screen
Products to avoid:
- Most Windex products, acetone, ethyl alcohol, or Clorox wipes for the screen
- Paper towels, toilet paper, tissue paper, and non-cotton fabric
- Water
Mute yourself in a web conference
Mute all attendees at once in a Zoom meeting
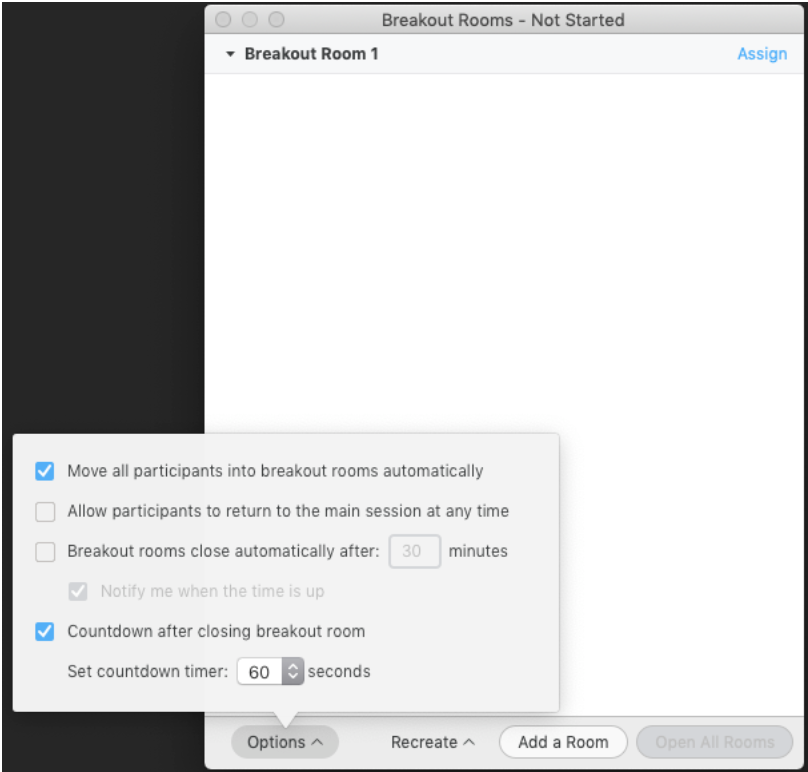
Zoom Breakout Rooms
Zoom Breakout Rooms can be used to split meeting attendees into separate, smaller groups that you–as host–can switch in and out of. Select Breakout Rooms from the bottom menu. Once rooms have been started, click Options to customize the experience.
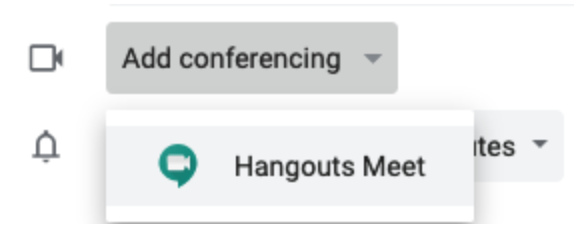
Add a Google Meet web conference to a Google Calendar event
Add a Google Meet web conference to any existing Google Calendar meeting by clicking “Add Conference” and selecting Hangouts Meet. All attendees can instantly see and click the conference link.
Link to a specific spot in a Google Doc
- Go to the section you want to jump to, then choose Insert > Bookmark from the top menu items;
- Highlight the text you want to make a clickable link to this bookmark;
- Choose Insert > Link from the top menu items, then choose Bookmarks, and choose your bookmark.
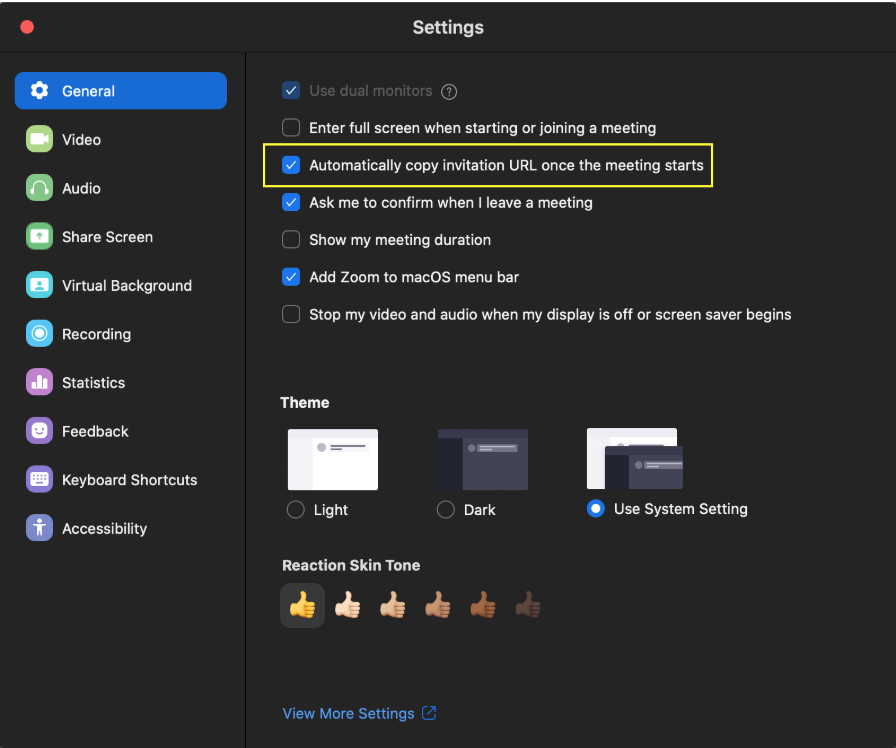
Keep your Zoom meeting URL in your clipboard for easy sharing
You can automatically copy your meeting URL to the clipboard when starting a meeting for quick access to send via email/chat/text. Find this (and other!) options in the Zoom application preferences menu.
Screen capture tips
- Temporarily put all your desktop items into one folder, ideally in a location away from the desktop.
- Temporarily make the desktop background a solid color.
- Hide your dock (Command+Option+D will show/hide).
- Choose full screen (if it’s available) with the application that you’re going to screencapture.
- If you’re recording a web browser, close any tabs that you won’t be using for your screencast or screen capture, and hide any bookmarks.
Turn WiFi Off
Using ethernet to connect to the network? Turn off wifi in your computer's network preferences menu to ensure your connection works properly.
Take a quick screenshot on a Mac
To create a screenshot on your Mac:
- click Command+Shift+4;
- you'll see a pointer with crosshairs appear;
- move it to where you want to start the screenshot;
- then drag the mouse to create the selection;
- click the mouse or trackpad to finish capturing the screenshot.
Your new screenshot will appear on your Desktop with a name that starts with "Screen Shot" and ends with the date and timestamp of the screenshot.
LaTeX -> Source
Find IP and MAC Address on Windows
Find your IP address and MAC address on a Windows machine by following these steps:
- Open a Command Prompt window
- Type ipconfig and press enter/return
- The resulting output will show all of the network connections your computer is currently using.
- Look under Wireless LAN Adapter Wireless Network Connection to locate the IP address if you're using wireless, or,
- Look under Ethernet Adapter Local Area Connection if you're using ethernet.
- Scroll to the end of the results. Type getmac and press enter/return
- The MAC addresses for your wireless and ethernet connections will be listed under Physical Address
Find IP and MAC Address on OSX
Find your IP address and MAC address on an OSX machine by following these steps:
- Open System Preferences
- Click Network
- In the left-hand pane, click Ethernet or Wi-Fi (depending on which connection you are currently using)
- The current IP address is listed under "Status: Connected" in the center panel
- Click Advanced at the bottom right of the center panel to find the MAC address
- In the window that pops up, click Hardware at the top right of the menu choices. The MAC address is listed at the top.
Screenshots on your iOS device
You can save a picture of your iPhone or iPad screen. Press and hold the Home button, then press the Power button. The screenshot has been saved to your camera roll.
Restart
Get a list of department employees
The Campus Directory in IRIS will give you names, titles, and contact info of all the members of campus offices and academic departments. Log in to IRIS, click Campus Directory, then select a department from the list.
Press ? in Gmail to see a list of keyboard shortcuts
When you are in Gmail, type ? to see a list of keyboard shortcuts. Of course, if you do this while you are composing a message, you'll just be typing a question mark in your message.
Open PDFs with Preview by default (Mac)
If you would like to have PDFs handled by Preview, and not some other program, follow these steps:
1. Open Finder, and highlight a PDF file
2. Select File > Get Info (or press command + i)
3. Within the File Info window, click "Open With" (near the bottom of the window)
4. If something other than Preview is listed under "Open With", click the drop-down menu and Select preview
5. To change preferences for all PDF file handling, click the "Change All" button.
All PDF files should now be opened by Preview.
Manipulating pages of a PDF document in Preview (Mac)
When accessing e-reserves or other PDF materials, you may wish to rotate or reorder the pages. Here's instruction for Preview (Mac OS X)
To reorder pages:1) Under the "View" menu, enable "Thumbnails"
2) Select the thumbnails of the page (click) or pages (shift+click) you'd like to move and drag-and-drop them to their preferred location
3) Save the file
To rotate pages:
1) Under the "View" menu, enable "Thumbnails"
2) Under the "Tools" menu, select "Rotate" [left or right]. (Shortcut: command-L and command-R)
3) Save the file
Switch between Gmail accounts without logging out
If you have a personal Gmail account in addition to your Reed Gmail account, you can link the two and easily switch to one without logging out of the other. Click on your account name (like "doej@reed.edu") at the top of the Gmail window, then click Add Account. After the two are linked, you can switch between accounts from that same menu.
Accessing commonly used administrative systems
Dropping lowest grades in Excel
If you're dropping the lowest grade(s) in your final grade calculations, Excel can do the work for you!
This example is for one student, for whom I have 19 grades. I want to drop the lowest four. The student's data is in cells B2 to T2.
The final formula to drop four of those 19 grades will look like this, and is broken down below:
=(SUM(B2:T2)-SMALL(B2:T2,3)-
=(SUM(B2:T2)
add everything up within that range
-SMALL(B2:T2,1)
subtract the (1st) smallest value w/in that range (for the second, change that to ,2 - etc)
... then divide by number of remaining cases. (in this case, 15).
For more Excel help, check-in at the helpdesk in the ETC, or browse other tech tips. Happy grading!
Activity Monitor
Is your machine running slow lately? Wonder why you hear it whirring and the fan is going at 11? It may be busy or stuck on something. In the Utilities folder (/Applications/Utilities, or Go... Utilities, or cmd-shift-u) is the little app Activity Monitor. Run it, check that you're looking at All Processes, and sort by CPU. Now you can see if something odd is taking up all your machine's brain power! Contact CUS if something seems amiss.
Change default PDF program from Adobe Reader (Mac)
While updating Adobe Reader, you may have inadvertently set your default PDF handling to Adobe Reader. To reverse this change, uninstall/delete the AdobePDFViewer.plugin from /Library/Internet Plug-ins .
For more on this, see the Adobe Reader help documentation.
Undo typing on your iPhone or iPad by shaking it
Shake your iPhone or iPad (with iOS 7) to undo typing. You have to shake pretty hard, but DON'T THROW IT!
Make the Finder faster
In more recent versions of MacOS X (10.6-10.8), the Finder displays the Size column by default. This means it has to calculate the size of all the things in each folder, which slows down the display.
To turn it off, click on the Finder then choose Show View Options from the View menu. Uncheck the Size box, and then push the Use as Defaults button at the bottom.
Paste unformatted text
In Mac OSX, you can remove formatting when you paste text by using: command-option-shift-v.
Learn Finder Shortcuts
Restoring cartesian layout for Spaces in Lion
One of the things we missed most in moving from Snow Leopard to Lion was the cartesian layout for Spaces. For a couple of weeks we've been using a tool called TotalSpaces that brings this back, and so far it's worked really well.
TotalSpaces is an inexpensive add-on for OS X Lion and Mountain Lion that brings back Snow Leopard-style cartesian Spaces. It also makes it easy to disable the transition animation when moving between spaces.
Typing in foreign languages
Typing in a foreign language can be tricky. Learn how to set up your Mac to write in another language.
You can also go to the IMC to get a plastic Russian keyboard cover that you can put on top of your regular Mac keyboard to help you with typing.
Reed's Language Lab has additional resources for learning foreign languages.
Full-screen web browser mode for presentations
All those tabs, buttons, and menus on your web browser take up a lot of screen real estate, particularly annoying when you are giving a presentation. With Firefox, Chrome, and Safari (OS X Lion only) you can hide all that junk in one fell swoop. In Firefox and Chrome, look in the View menu for "Enter Full Screen" (Firefox) or "Enter Presentation Mode" (Chrome). In Safari, click the diagonal arrows at the top right of your browser window. To see your menus again, move your mouse to the top of the screen.
Printing Tip for Administrative Staff
Synchronize your bookmarks between computers
Both Firefox and Google Chrome have built-in support for synchronizing bookmarks between your computers. Chrome users should select "Sign in to Chrome" from the wrench menu or click the "sign in" link in the upper right corner of a new tab. Next, enter your reed.edu email address (username@reed.edu) and password, or use your personal Google account if you prefer. Firefox users should open their preferences, go to the "Sync" tab, and click "Set up Firefox Sync." Repeat the process on your other computers, but not public ones of course!
Update Thunderbird or Firefox Despite Errors
After downloading a newer version of Thunderbird or Firefox and following the instructions, you may receive an error that you don't have sufficient permissions to move the program to the Applications folder. Try this:
- Quit the program you are trying to update.
- Navigate to your Applications folder and locate the current program.
- Drag that file to the trash.
- Now you can copy the new version to the Applications folder.
Save an image from a web page
Almost any image you see on a web page can saved to your computer. Simply click and drag the image from your web browser to your desktop.
Data analysis in Excel 2010
Apostrophes on the iPad
If you're tired of switching to the iPad's secondary keyboard every time you need to type an apostrophe, try this instead: On the main keyboard, swipe upward on the comma key. An apostrophe will appear!
Replace an existing file in Cascade
Let's say there's a "scholarship-app.pdf" in Cascade and you want to replace it with an updated version of the same name. In Cascade, click on the old file, then click the Edit tab. Use the Browse button to choose and upload the new file from your computer. After uploading, click the Publish tab. Note, this works with any file in Cascade (.jpg, .pdf, .doc, etc) but NOT with entire web pages.
Subscribe to an RSS Feed (Huh?)
Want a really easy way to keep abreast of the latest Tech Tips, articles on your favorite news site, or posts on your favorite blog? Here's how to do so by subscribing to an RSS feed:
- First, you need a "feed reader." Let's use the Firefox web browser (it has a feed reader built in!).
- Second, you need a "feed" for your favorite frequently updated website; this icon
 indicates your favorite site publishes an RSS feed version of itself. Let's use IT Tech Tips as an example.
 - Now you need to subscribe to the "feed" using your "feed reader" -- here's how:
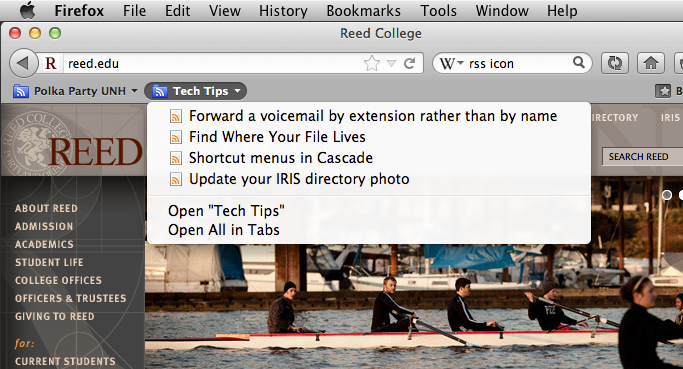
- Click the RSS feed icon at the top of the Tech Tips webpage (you might want to open a second Firefox window with Tech Tips in it so you can read these instructions while you try it out).
- Click the Subscribe Now button on the page that appears (make sure the "Subscribe to this feed using" menu is set to "Live Bookmarks" first).
- Pick a convenient Bookmark Folder in which save your subscription, like in the Bookmarks Toolbar, and click Subscribe.
Done! Now sit back, relax, and enjoy easy reading of your favorite feeds:
Report spam and phishing attempts
Don't just forward that email to CUS or ACS. The only way to make Reed's anti-spam and anti-phishing filters stronger is to forward that spammy or phishy message as an attachment to report-spam@reed.edu or report-phish@reed.edu.
Don't know what that means? Custom instructions for you are right here.
Starting up an unresponsive iMac
After a power outage or surge, however brief, some iMac models won't start when you press the power button. To resolve this issue, first locate the power cable in the back of the machine. The power cable for all newer flat-panel all-in-one iMacs can be found in the center of the machine near the bottom of the back panel. The power cable is a thick white cord. Pull the cord from the back of the iMac and wait five seconds. Re-connect the cable and press the power button.
If the machine still doesn't start up, remove the power cable from the back of the iMac and also the from the power source. Verify that the power source is active. Re-connect both ends of the power cable and press the power button again.
Campus Email Preferences
Did you know that there are some useful preferences for your Reed email account that you can control? Log in to IRIS and click on Campus Email Prefs (it's under Personal Info).
From there you'll be able to manage the following preferences:
Addresses
When you created your Kerberos account you automatically got an "@reed.edu" address based on your username. You also got something called an "alias" which lets people send email to "Firstname.Lastname@reed.edu" in addition to "username@reed.edu".
If you would like additional aliases you may request them from the Addresses screen in Campus Email Prefs. Aliases must be approved before they are activated so please be patient.
Delivery
If you wish to activate or change the forwarding of your email you can do so here. This is the preferred method of forwarding your email; using the POP retrieval feature of Gmail and other mail services is not recommended because it requires giving your password to third parties and is slower than real forwarding.
We hear from several people each year who have set up POP retrieval instead of forwarding without realizing some of the unintended consequences.
Spam & Trash
Your spam and trash folders can be emptied automatically; set the frequency here. Please note that these preferences will have no effect if you are forwarding your email.
Create an email signature in Thunderbird
Follow these steps to create an email signature in Thunderbird:
- Compose a new blank email message and type in your signature information.
- Go to the File menu and select Save As -> File.
- Give the file a name like Signature and put it in a place where it can stay and you can locate it in the next steps.
- Close the message with your signature.
- Go to the Tools menu and select Account Settings.
- Check the box that reads 'Attach this signature...'
- Click the Choose button and navigate to the file you created in steps 2 and 3.
- Click OK.
Find Where Your File Lives
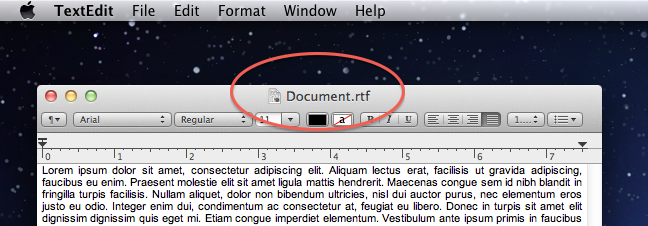
Editing a document and want to know where the file lives? Hold down the Command key (⌘) on your keyboard and click the file icon in the title bar of your window:
A drop-down menu will then appear, showing the location of your file in the folder tree on your system:
 The folders listed in this drop-down menu are the parent, grandparent, great grandparent, etc. folders of your file. In this example, the file Document.rtf lives in the Desktop folder, which itself lives in the blah folder, and so on. You can click on a folder to open it in a new Finder window.
Accents on the iPad
To type accented characters (é, ñ, ö, etc.) on the iPad, press and hold the key of the letter that needs the accent. A menu of possible accents will appear. Slide your finger over to the one you want, then let go to type the accented character.
Managing Moodle email
Shortcut menus in Cascade
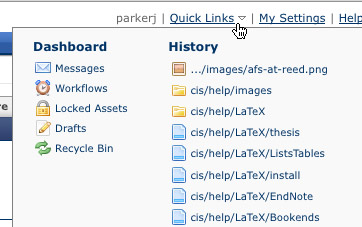
Reed's content management system, Cascade, has two handy shortcut menus:
Click "Quick Links" at the top of the page for links to common areas of Cascade and a list of your recently viewed assets.
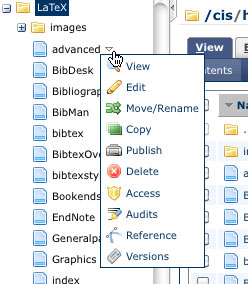
Hover your mouse over any asset and click the tiny arrow that shows up to perform various actions on that asset (Edit, Publish, Move/Rename, and more). Saves you a click!
Update your IRIS directory photo
You don't like your IRIS directory photo? You can change it it! Log in to IRIS and click on "Information Update" under the "Personal Info" section. See your current photo in the "Profile" tab. Click "Edit Info" and follow the instructions to upload a new photo.